Page History
...
Realize that the following information is a generic description of the user interface. Specific content of a knowledge based system will determine on the determine the specific information it presents. To make a separation between the responsibilities of Quaestor and the developer of the knowledge based system, the Knowledge engineer, think about the following:
...
The standard Quaestor GUI layout can be rearranged at any time by selecting the menu options: Window>StandardView>Window configurations. As with the start-up of Quaestor, in general there are two standard views:
- As a userUser, thus when working in a project (for every user level);
- As a developer, thus when working as Knowledge Engineer in a Knowledge Engineer working in a knowledge base;
2.1 Standard view for an End-user, Domain expert and Knowledge Engineer using a project
For an End-User, a Domain Expert and a Knowledge Engineer in a project file, Window>Standard View>Window configurations>User will result in:
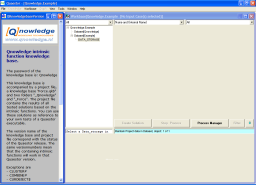
Click here to see large..
...
2.2 Standard view for a Knowledge Engineer in a knowledge base
Window>Standard View>Window configurations>Knowledge engineer as an a knowledge engineer in a knowledge base will result in:
...
As a Knowledge Engineer you will have two more windows in addition to the Explanation window and the Workbase: Knowledge Browser and Slots & Properties.
The Knowledge Browser is your main access to the knowledge (such as parameters, relations, constraints) in the system (stored in frames).
The Slots & Properties window provides access to specific properties for the knowledge (or frames = parameters, relations, constraints) you are able to select in the Knowledge Browser.
...
Every process (calculation, task, whatever) starts with the Process Manager. At the start of a project, this window is automatically initiated, you can also activate this window using theProcess Manager button (when the classic Workbase buttons are used, push or the S button on the right side of the recorder buttons. We advise to use the new Workbase buttons ). Depending on the specific knowledge base, the process manager enables you to:
...
You give input and choices in the Workbase, the right part of the interface. And while doing so, you are provided with additional information on selected parameters or values in the Explanation window the Explanation window on the left side. The Explanation window will always follow your selection in the Workbase (either a tree item, something in the list or something in the table of the Workbase ). Furthermore, note that Quaestor also provides feedback by means of colors and font styles.
...
By providing answers and choices to questions in the Workbase and using the Workbase buttons to continue, you will be guided through an analysis, design or engineering process. If the correct input is provided and choices are made, you will end up with a result. Quaestor will Quaestor will inform you if this was not possible.
...
When a result is achieved. You can go through all input, intermediate and end results in the Workbase by selecting values and (in case of documents) double clicking values. Note that associated programs will start and load the associated files when you double click them. A Back to Quaestor window will appear on top of the started program in order to return to Quaestor.
Like during the dialog, you will see that the results are presented in all kinds of colors and font styles. These colors and styles have a meaning, go to Quaestor Workbase colors and font styles to read about the details.
...
As a result (and mentioned in the above standard views), the knowledge engineer required additional windows, such as the Knowledge Browser, Slots & Properties and the Frame Viewer to have additional views on the knowledge base.
...
By means of the Knowledge Browser the KE is able to browse through all parameters, relations and constraints (frames). The Frame Viewer and Slots & Properties will follow the selections in the Knowledge Browser and enable you to modify all kind of aspects on the selected frames. Furthermore, the Knowledge Browser will follow your browsing through the Workbase.
Because all the Childs are interconnected you can easily follow the relation between a result and its origin. For instance, when you select a value of a result in the Workbase, the Frame Viewer tells you which relation requested the value and which relation has determined the value. In addition the parameter is in focus in the left bottom side of the Knowledge browser, and when you select this, it will show all the relations the parameter is part of, and by double clicking which relations can determine the parameter.
- Flash demo of a simple knowledge base with Workbase-Knowledge Browser connection: click here....
- Flash demo showing the difference between Workbase-Knowledge Browser connection switched on and off: click here....
- Flash demo of a Taxonomy knowledge base with Workbase-Knowledge Browser connection: click here....
Editing knowledge
Editing you use a combination of the Knowledge Browser, Frame Viewer and Slots & Properties.
Note that most of the functionality for the Knowledge Browser is part of the right mouse menu functionality, see also in the following sections.
...
Any additional modifications to reference text or attributes and data in the data slot can be done by means of the Frame Viewer and Slots & Properties. Put the focus on a parameter in the Knowledge Browser and make your changes in the Frame Viewer and Slots & Properties.
Adding parameter can be done in two ways:
- When a relation is added, the new parameters are added to the knowledge base;
- Use the right mouse menu option "New Parameter/Function..." in the Knowledge Browser (or the main menu);
...
- Implicitly, using the pre-defined syntax (see also QuaestorSyntax):
- $ at the end of the name means string type: the parameter is used for text values;
- # at the end of the name means TeLiTab type: this is the Quaestor data the Quaestor data structure for a combination of Text, List values and Table values.
- % at the end of the name means integer type: See [1].
- Normal parameter name is assumed to be of the value type: this can be any real number.
- By defining this in the "New Parameter/Function..." window;
In other words, when you add parameters by means of a relation, you can also define the type of the parameter.
Note that due to some choices in design, a string parameter in Quaestor cannot in Quaestor cannot be changed to a value type (so removing the $ will not help...). In that case you have to create a new parameter with the correct type.
...
Modification of expressions (relations or constraints) is done by means of the Expression Editor. The window automatically opens when you select an expression and press F2. You can see expressions in the Knowledge Browser by:
- Double clicking on the class in the tree view;
- Go to a specific relation through the browsing process described above;
- Make a specific view by means of the filters in the Knowledge Browser;
When the Expression Editor is opened, it shows the expression in the top part and any additional attributes and data in the bottom part. You can simply modify the expression in the normal way.
The Expression Editor contains syntax information through the Tooltip [2] and a proposing mechanism (a drop down box) for available functions and parameters, based on the parameter type of the left side parameter and any further requirements inside a syntax of a intrinsic function. These two assistants work dynamically while typing your expression. Furthermore, we use syntax coloring for string information (not string parameters), brackets and logical words like AND, THEN, ELSEIF, etc.
New relations can be added using the right mouse menu of the Knowledge Browser. The same Expression Editor is opened and the last parameter or relation that was in focus is included as starting point.
...
Because we want you to think about this, deleting is normally disabled. You can only enable deleting by selecting the File menu item "+Allow +Deleting+Frames>Allow deleting frames". Every knowledge base is (re-)protected when you (re)start it in Quaestorin Quaestor.
Organise in classes
Beside a description of all your parameters, relations constraints etc. you are able to group relevant parameters and relations in classes in the class tree. You can create a new class and arrange existing classes in the class tree on the left side of the Knowledge Browser and drag and drop parameters and relations in these classes.
The purpose of classes is to organise your parameters. You do this by selecting any existing class and press the right mouse button.
...
To reorder the classes you have to press the button between the forward and back buttons of the knowledge browser (field 2). This button will switch the class tree view between Class List, Domains and Class Tree view (the default view). Please note that button has the name of the view you will switch to (and not the present view). In the Class List mode you will see all classes presented in a syntax showing sub-classes after a dot. So, a sub-class of "Top Goals/Undefined" class is presented as "Top Goals/Undefined.sub-class". You can simply drag and drop the presented class entries in order to manipulate the order of classes and sub-classes. The only class you cannot move is "Top Goals/Undefined".
Please look at the KE Tutorials and Documentation of Knowledge for more details.
Testing knowledge
...
- Workbase, to provide input during a dialog and navigate through all solutions;
- Explanation, to present all reference information (and all other binary data connected to parameter, objects and relations that can be visualized in a web browser);
- Knowledge Browser, to add, modify and navigate through all knowledge;
- Frame Viewer, to view and change details on parameters, relations and constraints;
- Slots & Properties, to view and change properties of parameters, relations and constraints;
In addition to these windows you have windows that are activated by Quaestor when by Quaestor when you carry out a specific action, such as the Knowledgebase Clipboard, but for instance also the Web browser to provide additional help for intrinsic Quaestor functions. The additional windows are:
- Trace Viewer, specialized window to debug modeling and evaluation of solutions;
- Web Browser, to view web pages, pdf documents, text, etc. in a separate window;
- Graph, simple viewer for multi-case values;
- Knowledgebase Clipboard, to export knowledge from the Knowledge Browser to a separate file, etc.;
- Workbase Clipboard, to export results from the Workbase to a separate file, etc.;
- Expression Editor, to edit expressions (relations, functions, constraints);
- Compose Text, to compose text based on text fragments in the Knowledge Browser or Workbase;
Finally you have special modal windows, for instance required to control Quaestor in control Quaestor in combination with other programs. The special modal windows [3] are:
- Report, to view reports generated by Quaestorby Quaestor;
- Process Manager, to select datasets and tasks and start a analysis, design and engineering process;
- Back to Quaestor window, enabling and forcing you to return to Quaestor in to Quaestor in the correct way;
6 Overview of menu items
Quaestor has Quaestor has two types of menus:
- The standard menu on the top of the Quaestor the Quaestor [GUI];
- The right mouse menu which can be initiated in each window when by pressing the right mouse button ( ) showing specific actions related to that window.
...
For the standard menu items on top op Quaestorop Quaestor, below all items are described. For the right mouse menu items, it will depend on the selection (and user rights) what kind of items are enabled. Only de relevant items corresponding with the selection are presented.
The separation lines in the menu's are represented with "-".
6.1 Main menu items
- File
- New
- Open...
- Open Project...
- Find Project...
- Project History...
- Close KB / Close Project
- -
- Save KB / Save Project
- Save KB As... / Save Project As
- Save KB as Project...
- Save Frames as List...
- +Allow +Deleting+Frames>Allow deleting frames
- Protect File... / Unprotect File
- Encrypt File... / Decrypt File...
- Clean Sub Folders...
- -
- Print Setup...
- -
- MRU listMRU list
- -
- Exit
- Window
- Standard
- Cascade
- Tile Horizontally
- Tile Vertically
- Arrange Icons
- -
- Open Knowledge bases...
6.2 Right mouse menu items
...
Selection in the frame information part:
- Select as Goal
- -
- New Relation
- Constraint>
- New Parameter/Function
- Delete Frame
- Rename or Edit (depending on selection of a parameter or relation)
- Include Binary in frame
- -
- Frame to Clipboard
- Set to Clipboard
- Parameter to Dataset
- -
- Slots & Properties
- Illustration
- Complete expressions
- Compressed expressions
- -
- Add to Watch list
- Protect Input
- Summarize Relation
- List all values in Project
- Compose Text
- Search & Replace
- Expression Evaluator
- -
- Cancel
...
- the type of knowledge base ( Classic or Taxonomy-based);
- whether you are in an active or inactive Solution;
- what you have selected in the Workbase;
...
The main menu of the Workbase contains the following options:
- Workbase main menu
- Refresh
- Unreject
- Copy values
- Paste values
- -
- Solution/Object/Taxonomy/Entity sub menu))
- Database Input
- Process Manager
- Value to Table
- Value to List
- Unfold
- -
- Selection to Clipboard
- All to Clipboard
- -
- Filter Values
- Make Report
- Make Function
- Make Polynome
- Show Cluster
- -
- Cancel
The Workbase sub menu covers the following prime use cases as listed below.
During running or examining a Classic solution (not all options are visible or enabled at the same time):
- Solution
- New
- Accept all proposals
- Copy
- Delete
- Delete Object
- Recalculate
- Strip
- Trace On
- ((WorkbaseFind|Find)
- ((WorkbaseAddToCluster|Add to Cluster)
- ((WorkbaseMutate|Mutate)
- ((WorkbaseExpand all|Expand all)
- -
- Transpose Cases
- Case Matrix
- Add Case
- Insert Case
- Delete Case(s
- Delete Parameter(s
- Compress All
- -
- Show no Defaults
- Compose Text Value..
- Include Binary Data..
- Save as Initial Values
During engineering in a Taxonomy (not all options are visible or enabled at the same time):
...
During running or examining a Taxonomy solution (not all options are visible or enabled at the same time):
- "EntityName" (the actual name of the selected Entity)
- Copy
- Delete
- Synchronise with Taxonomy
- Recalculate
- Delete EntityName
- Recalculate Branch
- Trace On
- ((WorkbaseFind|Find)
- ((WorkbaseMutate|Mutate)
- ((WorkbaseExpand all|Expand all)
- -
- Transpose Cases
- Case Matrix
- Add Case
- Insert Case
- Delete Case(s
- Delete Parameter(s
- Compress All
- -
- Show no Defaults
- Compose Text Value..
- Include Binary Data..
- Save as Initial Values
In the Graph window:
Other menu's:
- Other right click menus
- Undo
- Cut
- Copy
- Paste
- Delete
...
Overview
Content Tools