Page History
Tutorial 4 Telitabs and solution management | Learning goals
|  |
1 Objective
In this Tutorial, we will evaluate the values of GM for each ship on the criteria stability and comfort for the crew. These criteria will be used to decide which ship is the most ideal, based on GM. Finally, we will generate one solution in which all the results of the previous tutorials are presented.
Start
For this tutorial, the knowledgebase from tutorial 3 is used. You can either use your own (verified) knowledgebase, or download it here: [Tutorial 4 Start]
2 Changing the dataset
- First, clean up the Workbase from any solution.
Remember that we gave attributes to the object Ships? These were used to make the object a multi case entry to the database, and when the Process Manager was started, the entire contents of the object could be selected as data. For the next steps in this tutorial, we want to use the Ships object, containing all our variations, as dataset in part of a relation. As we already discussed with the Hull object, this is only possible when it can be seen as object from the entry point in the dataset. However, at this moment Ships itself is the entry point.
...
3 Stability overview in one TeLiTab
It would be nice to have a clear overview of the stability of all your ships. Therefore, we'll create a TeLiTab containing the contents of Ships completed with GM_rounded, a rounded value of GM, and a ship number.
- Add the following relation to the class
Geometry:
GM_rounded = ROUND(GM, 1)
which is GM rounded to 1 decimal place in meters, also see the function ROUND(). Note that Quaestor automatically sets the number of decimal places for the display of a parameter in the Workbase to 2. Obviously, GM_rounded should be presented with only one decimal place, which can be changed in the Properties window.
Next, add the following relation to Geometry ,to set the ship number equal to the case number :
Ship_no = ORCA(1)
Obviously, it is dimensionless. You may want to examine the ORCA() function. Let's make the ship number the 'leading' parameter in the presentation of results. In its Properties, change the Output to value to HEADER. As only one parameter can be leading, set the Output to value of Lpp back to OUT.
- Finally, add the relation for the stability overview to
Top Goals/Undefined:
Stability# = Ships(@GM, @GM_rounded, @Ship_no)
By adding # to a parameter, Quaestor automatically makes it of the TeLiTab type (i.e. its 'dimension' is TeLiTab). Similarly, a $ results in a string type (see also QuaestorSyntax).
...
The relation defines that GM, GM_rounded and Ship_no should be added as goals in the Ships object for each case (B and Lpp combination). Stability# will contain the data from the original selected object Ships, augmented with the three columns and all data needed to calculate these results.
...
When solving for Stability#, is it needs the object Ships. If you select the object Data in the Dataset, the object Ships is available, because it is an object within Data.
...
4 Creating a section between TeLiTabs
It is desirable to assign a stability and comfort rating to each of your ships. This rating, based on the rounded value of GM, is available in TeLiTab format:0
| Code Block | ||
|---|---|---|
| ||
3 "GM_rounded" "Stab" "Comf" "1" 0.0 1 1 "2" 0.1 1 2 "3" 0.2 1 4 "4" 0.3 2 6 "5" 0.4 5 8 "6" 0.5 6 9 "7" 0.6 7 8 "8" 0.7 8 6 "9" 0.8 9 4 "10" 0.9 9 2 "11" 1.0 9 1 |
...
- Add the following relation to
Top Goals/Undefined:
Stability_check# = SECTION#(Stability#, "", TEXTITEM$(1), "", 1)
You may want to evaluate the syntax of this function, the description can be found here.
...
5 Display only the relevant parameters
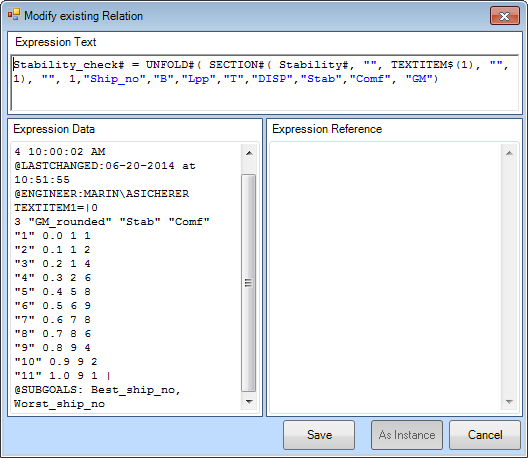
The result of the above calculations contains a large amount of data that will not be necessary in further calculations. To clean up the solution, by removing the parameters we do not want to be displayed, we will use the function UNFOLD#(). This function can be used to change the hierarchy of a TeLiTab and to include or exclude parameters from a TeLiTab. We will adjust the relation that we used to calculate Stability_check#, to exclude parameters.
- Edit the relation for
Stability_check#to become:
Stability_check# = UNFOLD#( SECTION#( Stability#, "", TEXTITEM$(1), "", 1), "", 1,"Ship_no","B","Lpp","T","DISP","Stab","Comf", "GM")
The meaning of this function can be found out by inspecting the documentation on UNFOLD#(). This function can be used to change the hierarchy of a TeLiTab and to include or exclude parameters. The mode of the function is 1 here, which means that only the parameters at the end of the syntax (Ship_no to Comf) are present in the TeLiTab. Now, only the relevant data is displayed in the TeLiTab Stability_check#.
6 Selecting the best and the worst ship
From the TeLiTab Stability_check# we can now select the ship that scores best on both "Stab" and "Comf" (Stability and comfort). To do so, we will use the function MATCHCASE().
- Add the following relations to the class
Stability:
Best_ship_no = MATCHCASE( Stability_check#, 2, "Stab", "Comf", 10, 10, 1)
Worst_ship_no = MATCHCASE( Stability_check#, 2, "Stab", "Comf", 1, 1, 1)
These new parameters are both dimensionless and System/Equation.
...
- In the Expression Data field of the relation
Stability_Check#in the Expression Editor, add the following attribute:
@SUBGOALS: Best_ship_no, Worst_ship_no
The parameter Stability_check# will now return an overview of all ships with stability and comfort rating. If this parameter is calculated, the best and worst ship number will be added to the solution because of the attribute above.
...
As mentioned in a previous tutorial, by means of the @ORDER attribute in the data slot of a parameter, you can organise the order in which the end result is presented.
8 Check
You can verify your results by comparing it to [Tutorial 4 Finished]
Overview
Content Tools