|
Tutorial 4
Telitabs and solution management |
Learning goals
|
 |
1 Objective
In this Tutorial, we will evaluate the values of GM for each ship on the criteria stability and comfort for the crew. These criteria will be used to decide which ship is the most ideal, based on GM. Finally, we will generate one solution in which all the results of the previous tutorials are presented.
Start
For this tutorial, the knowledgebase from tutorial 3 is used. You can either use your own (verified) knowledgebase, or download it here: [Tutorial 4 Start]
2 Changing the dataset
- First, clean up the Workbase from any solution.
Remember that we gave attributes to the object Ships? These were used to make the object a multi case entry to the database, and when the Process Manager was started, the entire contents of the object could be selected as data. For the next steps in this tutorial, we want to use the Ships object, containing all our variations, as dataset in part of a relation. As we already discussed with the Hull object, this is only possible when it can be seen as object from the entry point in the dataset. However, at this moment Ships itself is the entry point.
So to use Ships as a separate dataset we should do the following:
- Add a new object
Datato the knowledge base, directly in classTop Goals/Undefined(Determined by: OBJ) and add this object to the top of the dataset, by dragging it tot theDatasetnode. Now you have two objects,DataandShipsin the top level ofDataset. - Next add
@DBENTRYand@DBOBJECTto the objectDataand remove these from theShipsobject. The objectDatahas now become your entry point. - Now add a new
Shipsobject to theDataobject by dragging theShipsobject from the Knowledge Browser to theDataobject in the Dataset. Now you have aShipsobject in theDataobject and you still have theShipsobject on the top level. - Copy the data in the
Shipsobject on the top level to theShipsobject inside theDataobject in the same way that you copied the contents of theWaterlineobjectHullobject in the previous tutorial (see here). You will be asked whether or not to create new parameters, select Yes to All and click OK. - And finally delete the
Shipsobject on the top level. Select thisShipsobject in the tree and press DEL.
Now you are all set to continue with the next steps of the tutorial.
3 Stability overview in one TeLiTab
It would be nice to have a clear overview of the stability of all your ships. Therefore, we'll create a TeLiTab containing the contents of Ships completed with GM_rounded, a rounded value of GM, and a ship number.
- Add the following relation to the class
Geometry:
GM_rounded = ROUND(GM, 1)
which is GM rounded to 1 decimal place in meters, also see the function ROUND(). Note that Quaestor automatically sets the number of decimal places for the display of a parameter in the Workbase to 2. Obviously, GM_rounded should be presented with only one decimal place, which can be changed in the Properties window.
Next, add the following relation to Geometry ,to set the ship number equal to the case number :
Ship_no = ORCA(1)
Obviously, it is dimensionless. You may want to examine the ORCA() function. Let's make the ship number the 'leading' parameter in the presentation of results. In its Properties, change the Output to value to HEADER. As only one parameter can be leading, set the Output to value of Lpp back to OUT.
- Finally, add the relation for the stability overview to
Top Goals/Undefined:
Stability# = Ships(@GM, @GM_rounded, @Ship_no)
By adding # to a parameter, Quaestor automatically makes it of the TeLiTab type (i.e. its 'dimension' is TeLiTab). Similarly, a $ results in a string type (see also QuaestorSyntax).
One of the quirks of Quaestor is, that a parameter can also be assigned e.g. a string type in its Properties, and it does not get the $ appended to its name.
The relation defines that GM, GM_rounded and Ship_no should be added as goals in the Ships object for each case (B and Lpp combination). Stability# will contain the data from the original selected object Ships, augmented with the three columns and all data needed to calculate these results.
- Make sure
Stability#is determined by System/function.
When solving for Stability#, it needs the object Ships. If you select the object Data in the Dataset, the object Ships is available, because it is an object within Data.
Select Dataset/Data in the Workbase, and start the Process Manager. Just select Data, and run a solution for Stability# (Click on Next until the text on the button changes again to Data input). You might want to inspect your solution by opening the TeLiTab (double click on the value (Text/Telitab) of Stability# or press F2).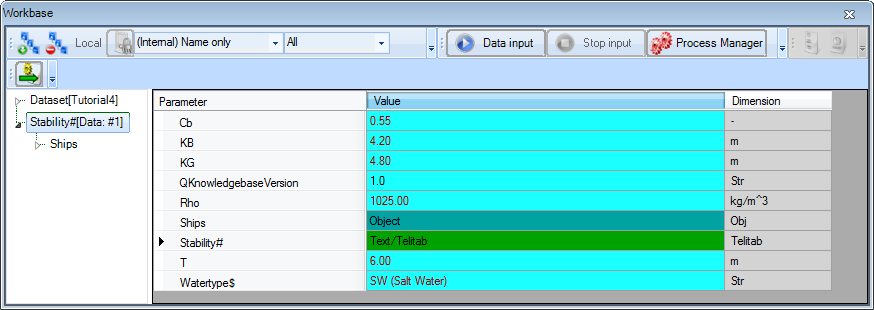
- Hereafter, delete this solution.
If Quaestor presents some parameters with an empty cell and waits to continue, these parameters may not be determined by System/Function or System/Equation. If you just press enter without changing something, the parameter will still be calculated though. If you'd like a fully-automatic solution, you'll have to change the determined by value in the Properties window of the pertaining parameter.
4 Creating a section between TeLiTabs
It is desirable to assign a stability and comfort rating to each of your ships. This rating, based on the rounded value of GM, is available in TeLiTab format:
3 "GM_rounded" "Stab" "Comf"
"1" 0.0 1 1
"2" 0.1 1 2
"3" 0.2 1 4
"4" 0.3 2 6
"5" 0.4 5 8
"6" 0.5 6 9
"7" 0.6 7 8
"8" 0.7 8 6
"9" 0.8 9 4
"10" 0.9 9 2
"11" 1.0 9 1
Your stability overview also contains values for GM_rounded, so these two TeLiTabs should somehow be combined.
- Add the following relation to
Top Goals/Undefined:
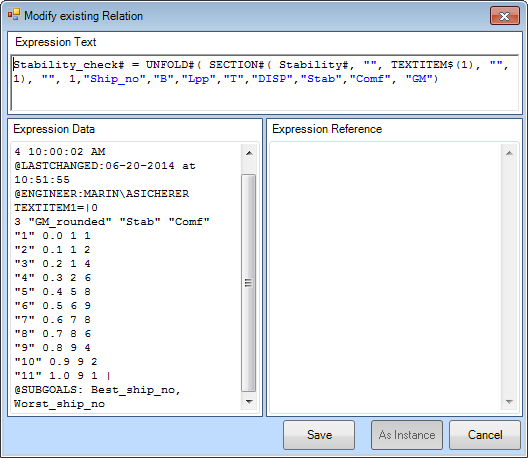
Stability_check# = SECTION#(Stability#, "", TEXTITEM$(1), "", 1)
You may want to evaluate the syntax of this function, the description can be found here.
Note that our rating TeLiTab should be included in the Expression Data field of the relation editor, as described in tutorial 3. Make sure the syntax is valid, the field should contain:
TEXTITEM1=|0
3 "GM_rounded" "Stab" "Comf"
"1" 0.0 1 1
"2" 0.1 1 2
"3" 0.2 1 4
"4" 0.3 2 6
"5" 0.4 5 8
"6" 0.5 6 9
"7" 0.6 7 8
"8" 0.7 8 6
"9" 0.8 9 4
"10" 0.9 9 2
"11" 1.0 9 1 |
If you run a calculation now with Stability_check# as top goal (and select Data as dataset), you will obtain a solution in which Stability_check#, using object Ships, augmented with GM, GM_rounded, Ship_no, Stab, Comf, KB, KG, BM and Moment_of_Inertia.
- Run a solution for
Stability_check#usingDatain the dataset. Inspect the TeliTab.
While you can normally see the TeLiTab result in the Workbase when double clicking a value of a TeLiTab parameter, for Stability_check# it does not open in the Workbase but opens as text. The reason is, that it containts parameters not yet defined in the knowledge base (Comf and Stab). When you would add these to the knowledge base, this changes.
- Delete the solution when done.
5 Display only the relevant parameters
The result of the above calculations contains a large amount of data that will not be necessary in further calculations. To clean up the solution, by removing the parameters we do not want to be displayed, we will use the function UNFOLD#(). This function can be used to change the hierarchy of a TeLiTab and to include or exclude parameters from a TeLiTab. We will adjust the relation that we used to calculate Stability_check#, to exclude parameters.
- Edit the relation for
Stability_check#to become:
Stability_check# = UNFOLD#( SECTION#( Stability#, "", TEXTITEM$(1), "", 1), "", 1,"Ship_no","B","Lpp","T","DISP","Stab","Comf", "GM")
The meaning of this function can be found out by inspecting the documentation on UNFOLD#(). This function can be used to change the hierarchy of a TeLiTab and to include or exclude parameters. The mode of the function is 1 here, which means that only the parameters at the end of the syntax (Ship_no to Comf) are present in the TeLiTab. Now, only the relevant data is displayed in the TeLiTab Stability_check#.
6 Selecting the best and the worst ship
From the TeLiTab Stability_check# we can now select the ship that scores best on both "Stab" and "Comf" (Stability and comfort). To do so, we will use the function MATCHCASE().
- Add the following relations to the class
Stability:
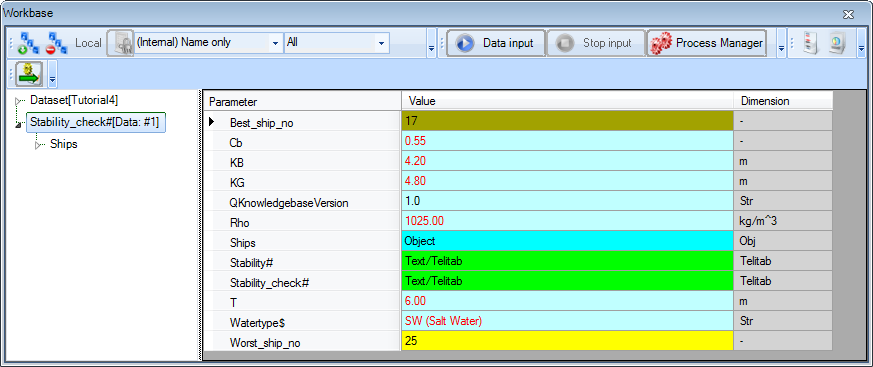
Best_ship_no = MATCHCASE( Stability_check#, 2, "Stab", "Comf", 10, 10, 1)
Worst_ship_no = MATCHCASE( Stability_check#, 2, "Stab", "Comf", 1, 1, 1)
These new parameters are both dimensionless and System/Equation.
These functions return the case numbers of the ships that score either highest or lowest on stability and comfort. The function MATCHCASE() returns integer values, so the number of decimal places should be zero for these new parameters.
7 One solution for all results
While working with a knowledgebase, it is convenient to have a small number of solutions that contain data in an organized way, rather than have a lot of solutions that contain separate results of calculations. In this paragraph, we will create one solution that contains the TeLiTab Stability# as well as the best and worst ship numbers.
To add a parameter to a solution that will be calculated after a defined top goal, the attribute @SUBGOALS can be used. It should be placed in the Expression Data field of the expression editor of one of the relations that is used to calculate the top goal. We will address the sub goals in the relation for Stability_check#.
- In the Expression Data field of the relation
Stability_Check#in the Expression Editor, add the following attribute:
@SUBGOALS: Best_ship_no, Worst_ship_no
The parameter Stability_check# will now return an overview of all ships with stability and comfort rating. If this parameter is calculated, the best and worst ship number will be added to the solution because of the attribute above.
- Run a solution for
Stability_check#using theShipsdata.
The result should look like this:
As mentioned in a previous tutorial, by means of the @ORDER attribute in the data slot of a parameter, you can organise the order in which the end result is presented.
8 Check
You can verify your results by comparing it to [Tutorial 4 Finished]
Overview
Content Tools