1 Mass calculation
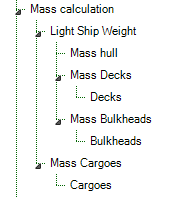
Now that the ship lay out is finalized, the first analysis, Mass calculation, can be performed. Incidentally, it is always possible to change the values you entered in the previous section. The child entities of Mass calculation are:
In the Mass Calculation entity, which is a subgoal of the total solution, the mass and the centre of gravity of the whole system will be calculated. These quantities depend on the mass and centre of gravity of both the ship itself (Light Ship Weight) and the cargo it carries (Mass Cargoes). The total mass is calculated by the summation of all mass components. The centre of gravity of a system of components is defined as the average of their positions, weighted by their masses. This method is used at every level (entity/subgoal) of Mass calculation.
In the entities Mass Calculation and Light Ship Weight (and Mass Cargoes) no input is requested from the user.The first 'stop' in the calculation process is in Mass hull.
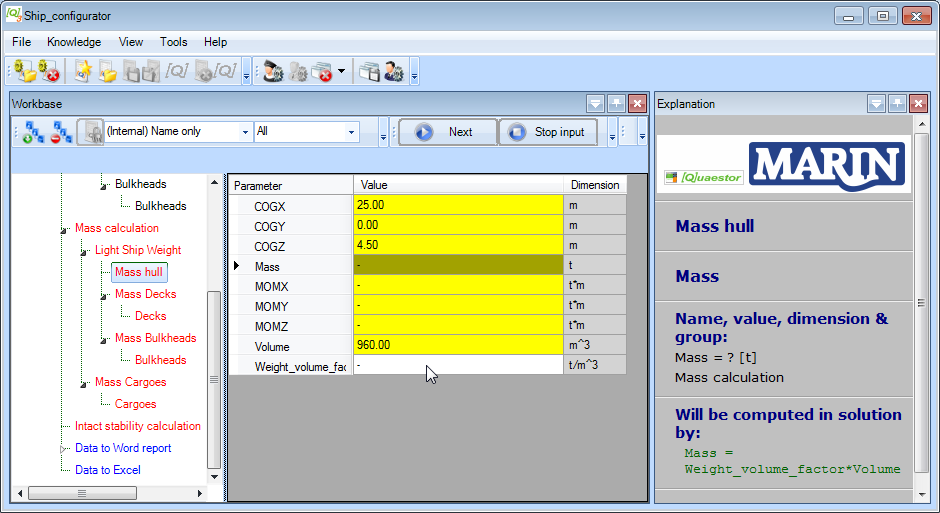
- If you have not done so already in the previous part of this tutorial, click Next. In any case, the screen should now look like this:
Quaestor will calculate all information in these entities when all required information from lower entities is available. You can see this because these entities are still colored red. A yellow cell will be calculated by a relation.
Based on the results of the entities Main Dimensions and Hydrostatics (in Ship design | Lay out | Hull), the centre of gravity and volume of the hull is determined. Scroll through the parameter list to see the used relations in the Explanation window. For this simplified ship configurator it is assumed that the mass of the hull can be computed by:
Mass = Weight_volume_factor * Volume
As a user, you only have to provide a weight volume factor. The moments around the X, Y and Z axis are determined by Mass multiplied by respectively COGX, COGY and COGZ.
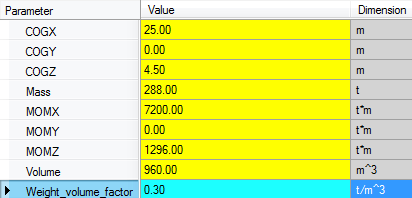
- Enter 0.3 [t/m3] as the value of
Weight_volume_factorand press Enter.
Quaestor calculates everything it can upto now and fills in all values in the list:
- Click Next to continue the calculation of the next subgoal (entity).
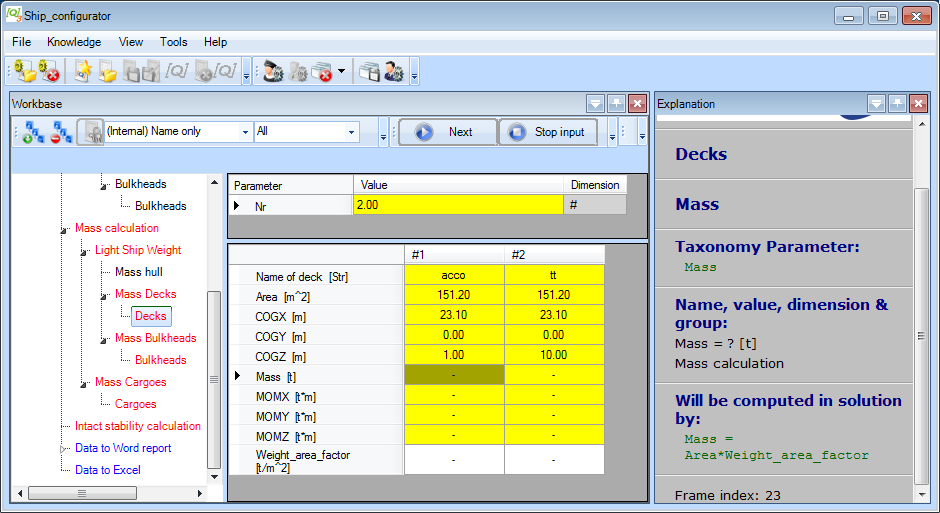
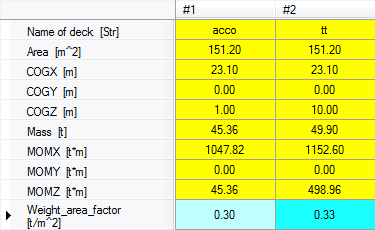
In the previous section, you defined the names and positions for two decks. The entity Decks presents a table which contains a number of parameters for each defined Deck.
Again, a yellow cell means that a value is be determined by a relation. The parameters Nr, Name of deck, and Area are automatically copied from the defined Deck entities below Lay out. When you add or remove a deck, or change properties of an existing defined deck, these adaptations will be automatically propagated to the Mass Decks entity.
The centre of gravity of a deck is based on the given location in your ship design. For this simplified ship configurator, it is assumed that the mass of the decks can be computed by:
Mass = Weight_area_factor * Area
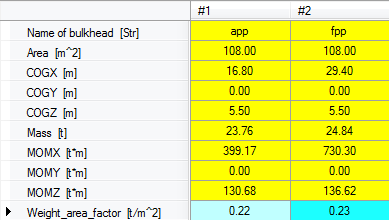
As a user, you only have to provide a weight area factor for each deck. The mass calculation as applied for decks is also used for the mass calculation of bulkheads.
- Enter the values 0.30 [t/m2] and 0.33 [t/m2] for the
Weight_area_factors of the decks and press Enter.
- Click Next and enter the values 0.22 [t/m2] and 0.23 [t/m2] for the
Weight_area_factors of the bulkheads and press Enter.
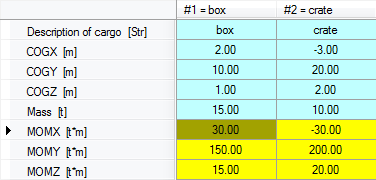
The last thing to do for the mass calculation is entering data for the cargo objects. You'll know how to do this. For this tutorial, limit yourself to a few objects, because otherwise you will have a lot to enter! Note that there is a picture of the coordinate system to help you in the Explanation window. For two pieces of cargo, the input will look something like this:
2 Intact stability calculation
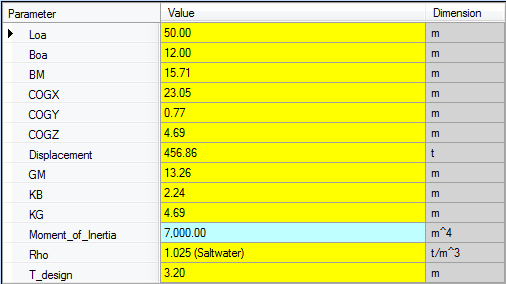
The mass and centre of gravity of the whole system are input for the intact stability calculation. For this tutorial a very unrealistic simplified stability calculation is developed. The moment of inertia of the water plane area is the only required input value.
The entity Intact stability is only included to give an idea how a configurator can be built with a taxonomy approach. Example input values for the entity Intact stability are presented below:
3 Data to Word report
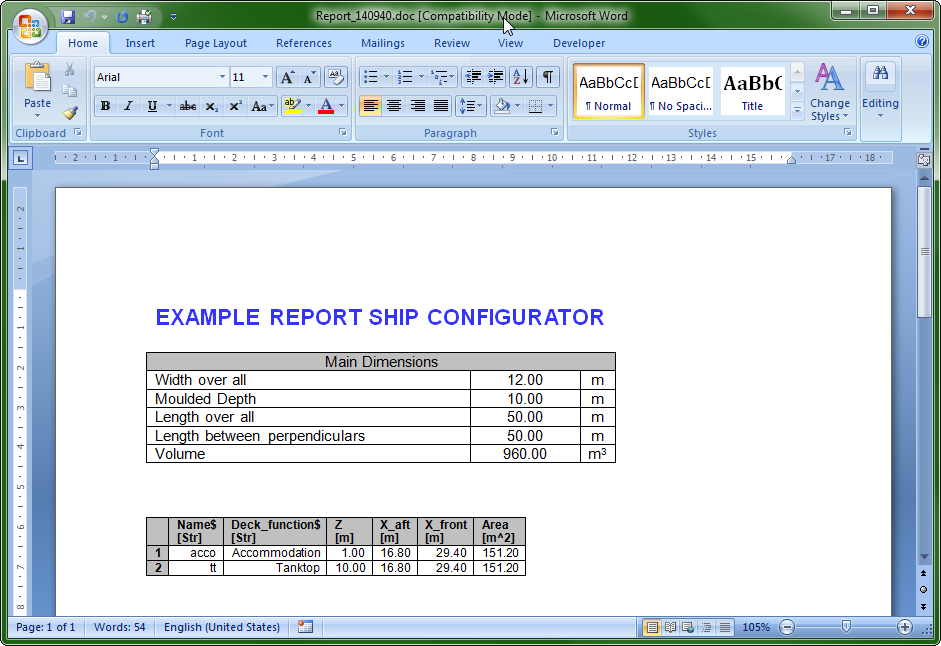
At the moment you leave the entity Intact stability with the Next button, Quaestor jumps automatically to the entity Data to Word report. Here you do not have to provide any input values. Quaestor will directly generate (if all information from the previous entities is available) a little MS Word report. When you have this document open at that moment, you will see the generation of the reports taking place on your screen.
Be aware that fatal errors may occur when you are actively working in Word while the reports are generated. Therefore, please wait until the documents are closed.
There are two ways to open the created Word documented from inside Quaestor.
- Select the parameter
Report_document$in the entityExample reportand click on “Click here for value” in the Explanation window below “Name, value dimension & group”. - Double click on the value of parameter
Report_document$.
Of course, it is always possible to find and open the document in your project folder on your computer. The example report document is built up from two sub documents (two chapters) that also can be watched / opened separately.
4 Data to Excel
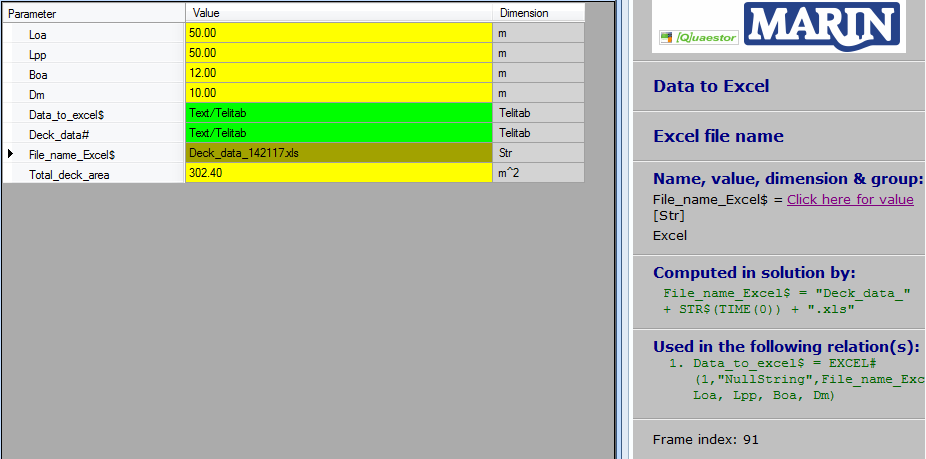
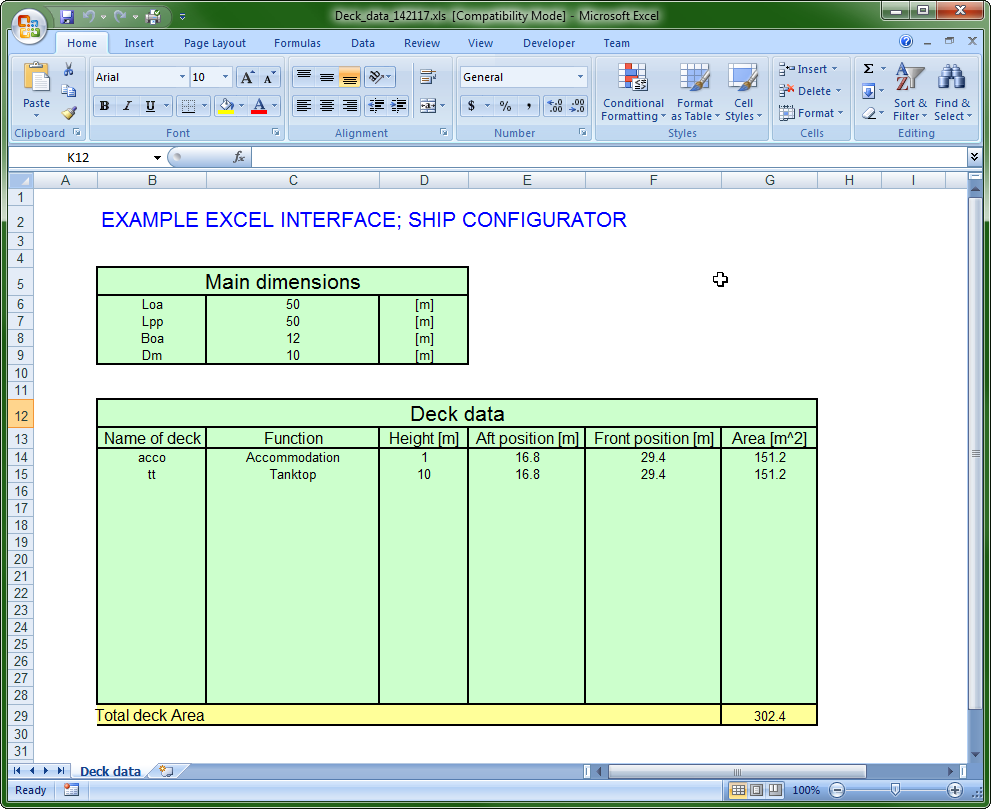
The main dimensions and a table of deck data will be written to an Excel file too. Here, the total deck area will be calculated and the result will be send back to Quaestor in parameter Total_deck_area. If Quaestor knows all the required data, the Excel file will be made at the moment you visit the entity Data to Excel.
The knowledge engineer (the developer) can decide whether to leave an Excel sheet (or Word document) open, or close it automatically. In the case of the Excel sheet, it was decided to leave the Excel sheet open.
There are two ways to open an Excel file from Quaestor.
- Select the parameter
File_name_Excel$in the entityData to Exceland click on “Click here for value” in the Explanation window below “Name, value dimension & group”. - Double click on the value of parameter
File_name_Excel$
Of course it is always possible to find and open the document in your project folder on your computer (The default path for the Ship_configurator is C:/Users/Public/Documents/My_Knowledge/Projects/_Ship_configurator/Solutions).
If you are a Knowledge Engineer, you might want to continue with the tutorial explaining how the database that was used here can be developed.
