Tutorial 2 TeLiTab and Objects | Learning goals
| Prior knowledge |
1 Objective
In this tutorial, you will create the shape of a ship's waterline in a table of frame numbers and relative, dimensionless widths. The dataset containing variations of the main dimensions of a ship from tutorial 1 is stored in a data object Ships in the dataset of the knowledge base, so it can be easily used in further calculations. This dataset combined with the dimensionless width table is used to calculate the width at the waterline at frame number 2 for every variation.
Start
For this tutorial, the knowledgebase from tutorial 1 is used. You can either use your own (verified) knowledgebase, or download it here: [Tutorial 2 Start]
2 Background information: TeLiTab data model and Questor object
TeLiTab is a term that will be used quite often in this tutorial. Therefore, an elaboration on the subject is in order in this very early stage for the tutorials.
TeLiTab is an abbreviation of Text, List, Table (see TeLiTab for more detail). It is the standard format in which data is stored inside Quaestor, the easiest way to use data inside a knowledge based systems and the easiest way to exchange data with external applications (see also Use of external or satellite programs). An example of a telitab is given below, the black text to the right is comment and is not present in the actual telitab.
|
Every level of a TeLiTab contains list items and an optional table. The table can be omitted, but if there are no list items present at a certain level, a '0' is required (like above in the resistance telitab). Parameters and case numbers are written between double quotes (""), values are not but strings with spaces in it should! For all syntax aspects please go to: TeLiTab
Quaestor Object
A Quaestor object contains a set of data, either static (only data, e.g. a speed power curve or a list of components) or dynamic, and represented as TeLiTab. An object can operate as a computational model, (requesting input and providing output) fulfilling the role of a function or subroutine in an assembled model (a ‘Solution’ in the Quaestor workbase).
The use of the TeLiTab format and Quaestor objects is covered in this tutorial.
3 Creating a new class
In order to create the geometry of your ship, you will need an object that contains frame numbers and relative, dimensionless widths. To keep the knowledgebase arranged logically, we will create a new class: “Geometry”.
- In the Knowledge Browser, create a new class named
Geometrydirectly below Top Goals/Undefined.
Creating classes is covered in tutorial 1.
4 Creating a table with the coordinates of the waterline
The ship is defined mathematically, which makes it convenient to generate. The relation between the Frame number (0 to 20) and relative width is:
Rel_B = 0.5 - 0.005 * (Frame - 10)^2
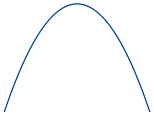
The shape of the waterline is a polynomial (a parabola). You can enter this function in the Geometry class in the same way as in tutorial 1.
- Add the relation above to the class
Geometry. The parameters are automatically created when entering a relation.Frameshould be listed as a user defined (VR) parameter andRel_Bshould be System defined (SYS). Don’t forget the dimensions (Rel_BandFrameare both dimensionless), and a proper reference for the parameters.
Using the function defined above, put the shape in an object.
- Add the following relation to the class
Geometry:
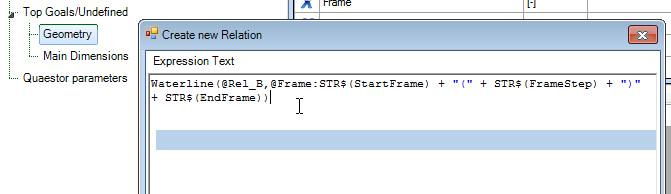
Waterline(@Rel_B,@Frame:STR$(StartFrame) + "(" + STR$(FrameStep) + ")" + STR$(EndFrame))
Upon saving the relation, the following questions will be asked:
- You will be asked whether
StartFrameis an Object. Say no; - Hereafter you will be asked whether
StartFrameis a Goal parameter or Input. Say no, because you want to provide this as input for theWaterlineobject; - These questions are also asked for
FrameStepandEndFrame. Say no to the Object question and no to the Goal parameter question. These values are input to the object.
- The three new parameters all are dimensionless and should be of the VR type.
The syntax of this relation defines a Function that creates an object Waterline including Rel_B and Frame the moment it is initiated (when you do a calculation). The first parameter, @Rel_B, makes sure Rel_B is the top goal (calculated value). The second parameter, @Frame, makes sure Frame is the input for the function, the expression following @Frame: STR$(StartFrame) + "(" + STR$(FrameStep) + ")" + STR$(EndFrame) defines what should be asked as input to create the range input within the Waterline object.
The general syntax used for Frame is @ParameterName:"Input". By using the intrinsic STR$ function with the parameters, you can give range input to the object, while for Quaestor it appears as normal single value input. This solves the limitation that you cannot give range input while building a solution. The @ in front of the parameters is to indicate that Rel_B and Frame are to be calculated in the object. See also QuaestorSyntax.
Note that just after you have created the expression, Waterline appears as a new parameter in the knowledge base with dimension object (Obj). So, in Quaestor, a parameter can be seen as an object and objects can be used as functions to perform calculations in.
- Select
Waterlineas top goal by double clicking it, and start a solution. Click Yes when asked if a new solution should be created. Quaestor will ask for theStartFrame,EndFrameandFrameStep. Please note that the parameters are requested in alphabetical order. Enter for theStartFrame0, for theFrameStep2 andEndFrame20, and click Next.
The result will look like this:
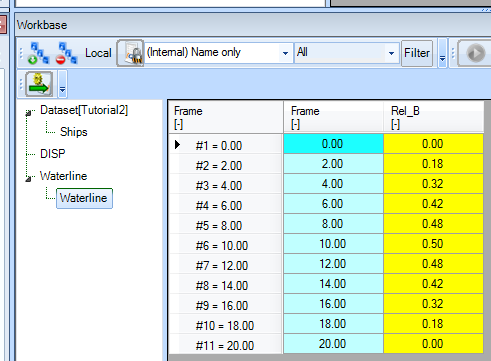
The solution is the object Waterline, which is filled with values for Rel_B for every case of Frame.
By using the @ORDER attribute in the Data field property, you can manipulate the input order (provide @ORDER:1 to StartFrame, @ORDER:2 to FrameStep and @ORDER:3 to EndFrame). Furthermore, please note that you cannot select Waterline as top goal when you are into the Waterline object in one of the solutions. The reason is that Quaestor assumes you want to add a parameter to this level and does not allow you to do so.
Please also note that inside the Waterline node, the dimension of Waterline is stated a Function, which is the correct conclusion drawn by Quaestor.
5 Managing solutions
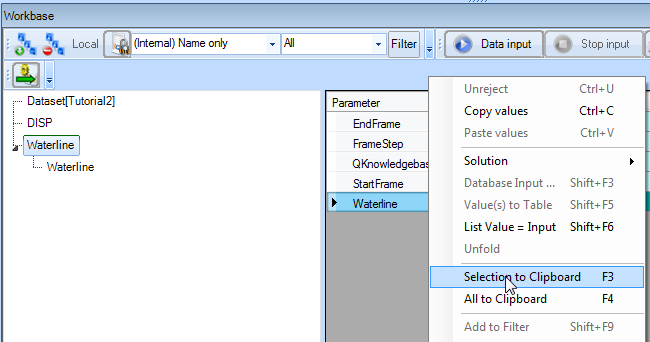
- In the solution Waterline, select the cell containing Object, right-click and select Selection to Clipboard, or press F3.
The Workbase Clipboard is opened.
- Click on Preview and the contents of the clipboard are shown. These contents consist of the contents of the
Waterlineobject: Click Cancel after this.
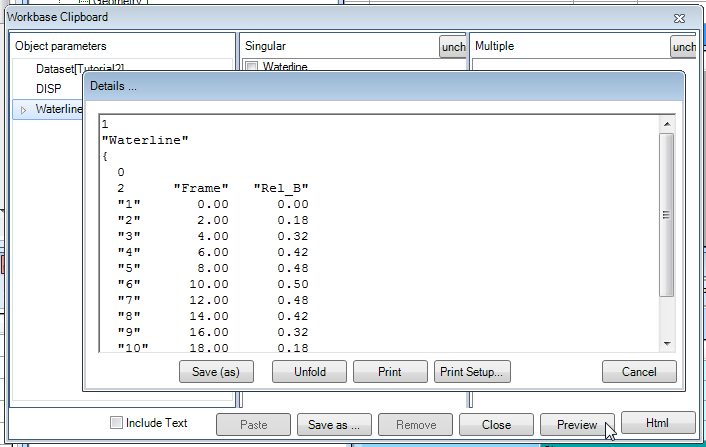
The TeLiTab format used to describe the contents of the object is clearly visible. There is 1 list item, named Waterline. This is a telitab (2nd level), containing 0 list items and a table with 2 parameters, Frame and Rel_B. The case numbers are shown between double quotes ("").
To clean up the Workbase from some of your trials, select the solution in the Workbase you want to delete, right-click and select Solution -> Delete or press Del. Click yes to confirm. The solution has been deleted from the workbase.

Manipulating solutions only works when Quaestor is not in calculation mode. Press Stop Input until this button becomes disabled to exit calculation mode.
6 Creating an object in the dataset
In the dataset, an object can be used to store static data in a Quaestor knowledgebase. This can be very convenient, especially when large amounts of data need to be stored as input for calculations. An object can be created at any time and it can be filled with data later, either manually or as a result of calculations.
In this paragraph, an object is created that will be given contents later on. We will create the object Ships.
- In the Knowledge Browser, select the class Top Goals/Undefined. In the right hand side, right-click and select New Parameter/Function (or press Ctrl+I). Name the Object
Shipsand select the type: Object.
Unlike the Waterline object, which was defined by a function, the object Ships does not yet meet the validity conditions.
- In the Properties window, change the Determined by field to OBJ: Value from Object/Database.
Ships is now a valid object in the knowledge base, but is not yet present in the dataset in the Workbase. We'll have to add it.
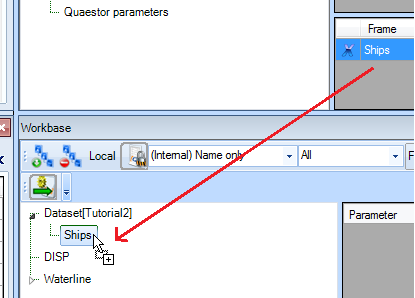
- Drag the
Shipsparameter in the Knowledge Browser to theDatasetnode in the Workbase.
The object is now added to the dataset, and can be filled with content.
7 Adding content to a data object
Our data object should contain all the ship variations produced in tutorial 1. Therefore, we will copy the results of the DISP solution (with the variations) to the object Ships using the clipboard.
- In the Workbase, right-click on the
DISPsolution and select All to Clipboard (or press F4). The Workbase Clipboard now pops up. Click on Preview. The contents of theDISPsolution are now displayed. You temporarily have to use a workaround now, because the Paste function is not yet implemented. Press Ctrl+A followed by Ctrl+C to copy the contents to the Windows clipboard. Click Cancel and close the clipboard. No need to save the values in there. Then right-click on theShipsobject in the Dataset and select Database Input or press Shift+F3. In the pop-up window that appears, select Use Editor and click Continue. In the window that appears next, press Ctrl+V to paste the data in the object. Click OK. Select Yes to All and click Continue.
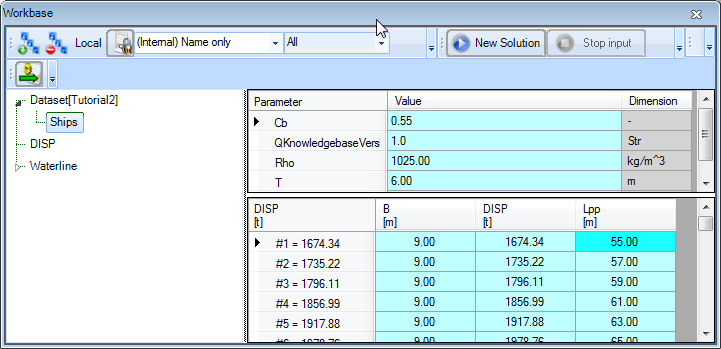
The object Ships is now filled with all the variations in length and width:
8 Accessing data in an object
- In the class
Geometry, create a new relation:
B_Frame = 2 * B * Rel_B
The dimension of B_Frame is meters (m).
This function states that the width of the ship at a certain frame number equals the relative width at that frame number multiplied with the total width of the ship. Notice that the frame number is no direct input in this relation, but Quaestor will still ask for it in a solution as Rel_B depends on that parameter.
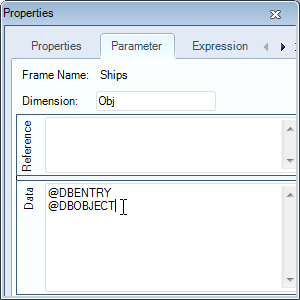
We'll use an alternative way of creating solutions. First we will add some attributes to the Ships object. Attributes are used to direct the behaviour of Quaestor in solutions. All available attributes are described here. We will apply two attributes: @DBENTRY and @DBOBJECT.
- Select the object
Shipsin the Knowledge Browser (it was created in Top Goals/Undefined). In the Properties window, select the Parameter tab. and in the Data field type:@DBENTRY @DBOBJECT
Attributes are either separated by a space or by a hard return, not by a comma. The meaning of the entered attributes will be explained at the end of this tutorial.
The main procedure to create solutions with an existing dataset is through the use of the Process Manager. In the Process Manager, datasets and top goals can be selected to create new solutions. Furthermore, existing solutions, macros or scenarios (these terms will be explained in another tutorial) can be restarted. First, we'll make sure our top goal B_Frame can be selected in the Process Manager.
![]() In the Knowledge Browser, drag the parameter
In the Knowledge Browser, drag the parameter B_Frame to the class Top Goals/Undefined.
Parameters can always be exchanged between classes, there is no influence on the behaviour of Quaestor except that parameters in the Top Goals/Undefined class are visible in the process manager.
Let's start a solution by means of the process manager.
- In the Workbase, click the S button or press the "Process Manager" button (Workbase buttons) to start the Process Manager:

The Process Manager starts. The left hand side shows all available datasets, in this case only our Ships object. The right hand side shows the available tasks. The parameters in the Top Goals class are shown here, as well as existing solutions. A combination of a dataset and a task results in a solution.
A combination of a dataset and a task results in a solution.
Figure 10 The process manager with datasets (left) and solutions (right)
![]() In the Process Manager, select Ships:#1 as dataset and B_Frame as task. Click the Compute B_Frame button. Data that is available in the dataset is proposed together with data still to be given (figure 11).
In the Process Manager, select Ships:#1 as dataset and B_Frame as task. Click the Compute B_Frame button. Data that is available in the dataset is proposed together with data still to be given (figure 11).

Figure 11 Data that is available in the dataset is already filled in
Because you can only give a range when you recalculated a solution, first provide one value for Frame and continue.
However, we do want to create a case matrix (calculate all possible combinations, see tutorial 1), and continue with the calculation. Therefore, after the solution is finished, restart in and provide a range for Frame: 0(2)20. The result of the calculation is a table with B_Frame for every ship of the dataset over the full length (frame 0 to 20).
The process manager can also be used to just select a dataset, and top goals can be selected in the knowledge browser. We will start the same solution, but add the displacement to the table.
![]() In the Process Manager, just select Ships:#1. Click the Select Ships button. In the class Main Dimensions of the Knowledge Browser, double click the parameter Disp to make it a top goal. In the class Top Goals/undefined also double click the parameter B_Frame (remember that multiple top goals are possible in Quaestor). Start a solution. Accept all proposed values (by pressing enter), for Frame first give a value and continue. Restart the solution and provide for Frame 0(2)20. Make a case matrix again and continue.
In the Process Manager, just select Ships:#1. Click the Select Ships button. In the class Main Dimensions of the Knowledge Browser, double click the parameter Disp to make it a top goal. In the class Top Goals/undefined also double click the parameter B_Frame (remember that multiple top goals are possible in Quaestor). Start a solution. Accept all proposed values (by pressing enter), for Frame first give a value and continue. Restart the solution and provide for Frame 0(2)20. Make a case matrix again and continue.
Now, the parameter Disp is shown in the output table too, together with its case depending parameter Lpp.
@DBENTRY, @DBOBJECT and the dataset
Finally, let's explain the attributes used. The @DBENTRY and @DBOBJECT are used to configure access to the Dataset containing objects. This is best experience by the difference in behaviour of the process manager.
The dataset of Quaestor can only containt objects on its top level (below the Dataset node). When you want to use the data in the Dataset, you can either select the object or define the object as database entry so that the Process manager will show it's content. @DBENTRY defines this entry point for selection of data by Quaestor (and thus in the process manager).
@DBOBJECT is an addition to the entry point definition and defines that an object may be available in the Dataset as multi case value. For instance several ships.
Try running the process manager without @DBOBJECT. It's now possible to select the cases within the Ships object, instead of the whole object (all cases). The reason is that Quaestor now expects there is only one relevant object, being the one specified as @DBENTRY, so only selections within this object are relevant to be shown in the process manager.
Please note that @DBOBJECT is an addition to @DBENTRY. So @DBENTRY should always be in the multi case object you want to use as entry point for your data in combination with @DBOBJECT.
Furthermore, at this moment it is not possible to do calculations for serveral multi case objects at once (this behaviour is suggested in earlier Quaestor version in situation where you use @DBOBJECT without @DBENTRY and as a result are able to select several or All Ships...).
8 Check
You can verify your results by comparing it to [Tutorial 2 Finished]
Overview
Content Tools