Page History
1 Including the first entity 
You are now going to create the first entity in the newly created taxonomy (see Preparing a knowledge base for Taxonomy/Entity use).
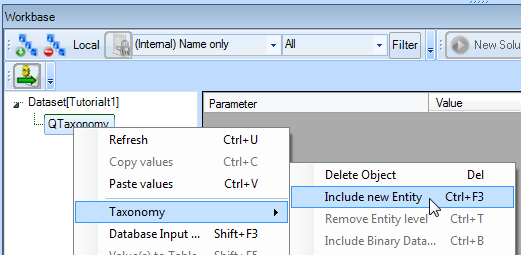
- Right-click on the
QTaxonomynode in the Workbase and select Taxonomy > Include new Entity, or press Ctrl+F3:
This opens the Entity Editor.
The entity type of the first entity in a Taxonomy tree, can only be 'Singular obligatory'. This means that this entity will always be included in a dialog.
- Provide the name
Ship configuratorin the field Entity Name and click OK.

Now your first entity is placed in the Taxonomy tree below the QTaxonomy object (note again that this is in the Workbase):
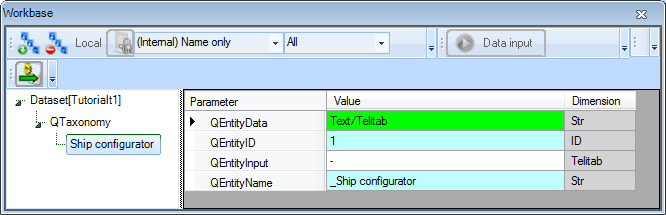
Every entity automatically contains the standard Quaestor parameters: QEntityName and QEntityID. Both parameters will not be visible during a process dialog for users. The value for QEntityID is unique and is automatically assigned by Quaestor. It cannot be modified by a Knowledge Engineer.
The value of QEntityName is automatically prepended with a prefix that indicates the type of Entity (in this case “_”, which means singular obligatory entity). Each entity type has its own specific prefix.
| Note |
|---|
When renaming an entity, be aware that changing the prefix will also change the behavior of the Taxonomy tree! |
| Info |
|---|
Values filled in the fields of the Entity Editor can always be included/edited later on. |
2 Including more entities 
Next, you will have to include a singular obligatory Ship design entity below the entity Ship configurator. That means that Ship design will always be included in a solution (below Ship configurator).
- Right-click on the
Ship configuratorentity in the Workbase. Select Taxonomy > Include new Entity or press Ctrl+F3 - In the Entity Editor, select Entity type Singular obligatory and name the entity
Ship designand press OK.
There need to be added some more entities now. These will be optional entities.
- Select the
Ship configuratorentity and press Ctrl+F3. Call the new entityMass calculationand select Entity Type Belongs to group of single optional Entities and press OK. - Do the same for the entities
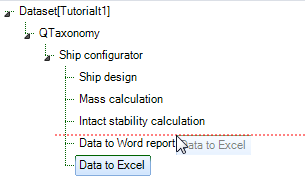
Intact stability calculation,Data to Word reportandData to Excel.
Belongs to group of single optional Entities will result in such an entity to be shown to the user in a selection window at the start of a solution run.
3 Changing entity type and sequence 
Once you have included an entity in your taxonomy, in the way described above, it is always possible to change the type of the entity.
As noted in the previous section, the type of an entity is determined by the prefix of its name. Each entity type has its own prefix. Upon creation of an entity, the pertaining prefix will be automatically prepended to the value of parameter QEntityName. This parameter is hidden for a user during a modeling session. A Knowledge Engineer can change a prefix of an entity name manually in the Workbase and thus change the type. However, be aware that changing the prefix will also change the behavior of the Taxonomy tree! So only do this when you are sure about the changes you want to make.
Once you have included entities in your taxonomy, it is possible to change their sequence. For example if you want to place Data to Excel above entity Data to Word report select Ship configurator. Now the Workbase shows all QEntity objects one level below the entity Ship configurator. Now click on Data to Excel and drag it to the location between Intact stability calculation and Data to Word report.
4 Creating a test solution
To see/test what you have created so far, it is always possible to build a (test) solution by selecting the QTaxonomy entity and clicking on the Process Manager Button. When you have finished your (test) solution you can easily remove the solution by selecting the solution in the Dataset of the Workbase and press Del.
| Info |
|---|
When you have built a solution, your |
Overview
Content Tools