Page History
1 Start process manager
In what follows, you will configure a very simplified virtual ship design and perform all optional analyses that are included in the knowledge base. This should give you a good impression of the process flow and will discuss the most common aspects of performing a Quaestor analysis based on the taxonomy approach.
1 Start process manager
A new design configuration starts with opening the Process Manager.
...
- For this tutorial, select both of them and click OK.
When you have selected the options Decks and Bulkheads, both entities are added below entity Lay out.
| Info |
|---|
Entities can have one of three colors:
|
...
| Info |
|---|
You can always decide to carry out only part of the conceptual design steps or provide the input in a different order. Just go to the pertaining parts in the tree and continue. Any relation between necessary input and steps in the process is taken care of by Quaestor. In other words, when input is required, it will eventually be requested. Furthermore, it is shown by the colors of the entities. |
...
5 Provide input values
...
When you have selected the options “Decks” and “Bulkheads”, both Entities are added below Entity “Lay out”.
...
Now, entity Main Dimensions is in focus and input values are requested in the list view:
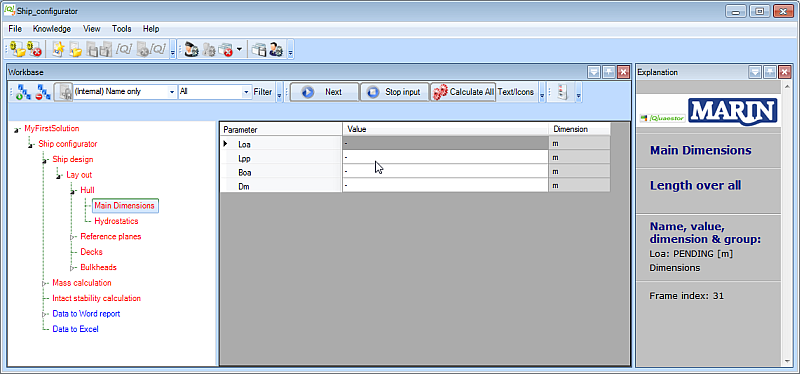
| Info |
|---|
| A white cell means that input values from the user are needed. |
...
| Info |
|---|
| While scrolling through the parameters in the list view, the Explanation window shows the descriptions and explanations for the selected parameter. |
Once an input value is given, the cell color changed to light blue. You are can always able to change your input values later on.
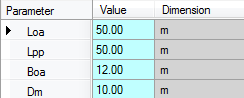
Figure 12 shows example input values for Entity “Main Dimensions”.

Figure 11: Provide input values for Entity “Main Dimensions”

Figure 12: Example input values Entity “Main Dimensions”
4.5 Provide input values for Entity Hydrostatics
After completing Entity “Main Dimensions” press “Accept & Continue” to accept your input values. Hereafter Entity “Hydrostatics” is in focus, see Figure 13.

Figure 13: Provide input values for Entity “Hydrostatics”
- Enter input values as shown here and click Next:
Now, entity Hydrostatics becomes selected in the tree:
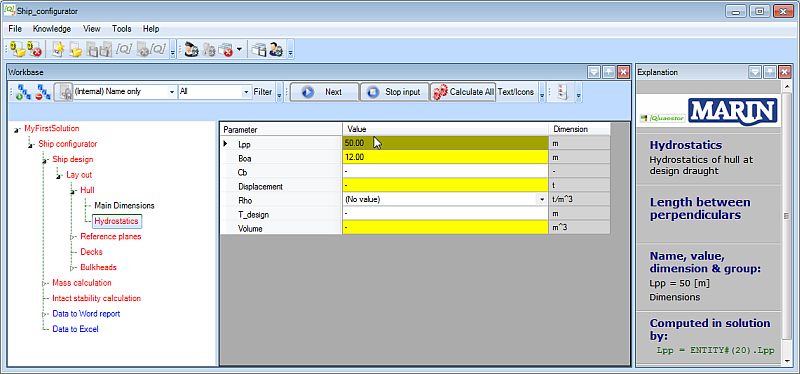
You see that yellow and white cells You see that yellow and white cells are shown. A yellow cell means that a value is a top Top Goal for the analysis (inside the Entityentity) and it will be determined by a relation. For example, select “Lpp” in the Entity (shown in Figure 13) and you can see that the value 120 is value is computed by means of the relation Lpp = Entiy#(20).Lpp, as explained shown in the Explanation window on the left.
When If you do not have the explanation part “Computed in solution by:”, please go to the Explanation tab of the Options windows (Tools>Options…) and select the “Requested select Tools > Options > Explanation and check Requested by/determined by” optionby.
A Knowledge Engineer can define a minimum and/or maximum value for a parameter. Quaestor will issue a warning if the computed or input value exceeds the indicated boundaries. For example provide
- Enter value
2for parameterCb
...
- and press Enter.
A warning message appears, telling you that Cb should be between 0 and 1. After you click OK, you will see that the value does get accepted anyway!
- Enter input values as shown here and click Next:
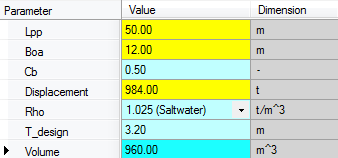

Figure 14: A Knowledge Engineer can define a minimum and maximum value for a Parameter
Example values for Entity “Hydrostatics” are given in Figure 15.
Please note that the resulting value for parameter “Volume” is presented as a light blue cell, which is the default color to present an input value. Although, this parameter is calculated by; Volume = Cb*Lpp*Boa*T_design, as you can see when you select the parameter and look in the Explanation window (see Figure 15).
...
Overview
Content Tools