Page History
In what follows, you will configure a very simplified virtual ship design and perform all optional analyses that are included in the knowledge base. This should give you a good impression of the process flow and will discuss the most common aspects of performing a Quaestor analysis based on the taxonomy approach.
We assume you will start with a new project, as explained in chapter 1 Start a new ship configurator project. As mentioned, you need to have at least Domain Expert rights to be able to perform an analysis.
...
1 Start process manager
A new design configuration starts with opening the with opening the Process Manager by clicking .
- Click on the Process Manager Button
...
- . Click Yes when asked if you want to create a new solution and give it a meaningful name.
After you have provided a solution title and continue, a tree structure is built in the Workbase in which the first node (entity) has the name of your solution. This has a child Ship configurator and this has a child Ship design.
2 Select process steps
An options window appears which shows the available process steps. You can select those that you want to perform:
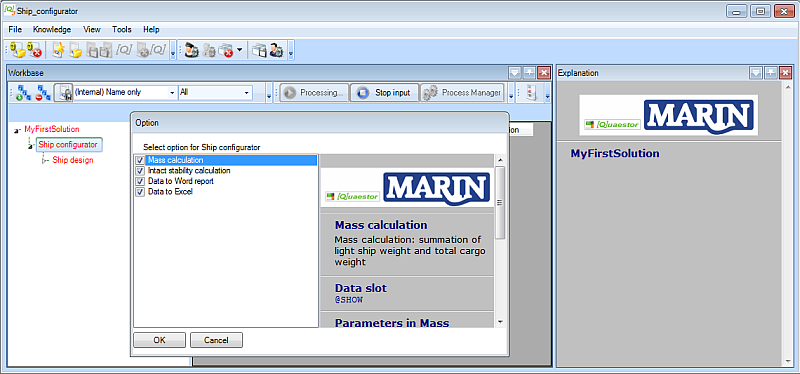
- For this tutorial, select all of them and click OK.
Please note that you can also decide to carry out only a part of the process steps. When you want to add other steps later, select the entity Ship configurator, press Ctrl+F5 and the options window will reappear.
Quaestor automatically checks dependencies between process steps. For example, select “Intact stability calculation” only. Now Quaestor automatically selects “Mass calculation” because “Intact stability calculation” apparently requires information from “Mass calculation”.
3 Select optional entities
After selecting the process steps, some entities are added to the tree structure. Now, you can select the optional entities Decks and Bulkheads.
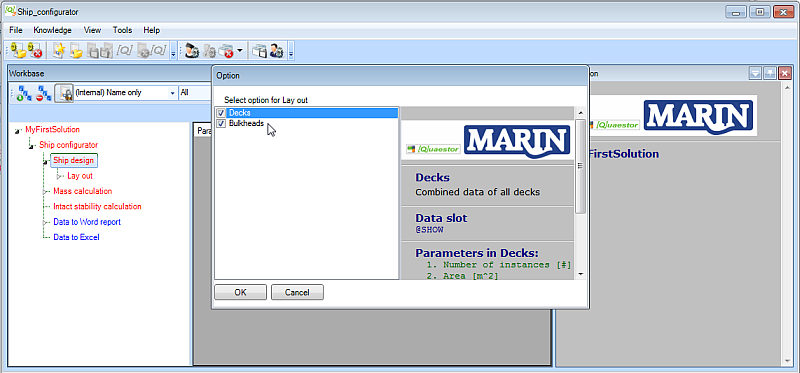
- For this tutorial, select both of them and click OK.
| Info |
|---|
Entities can have one of three colors:
|
4 Navigate processes
As soon as you start a new solution, the process buttons change their status and names. When you click the active button Next, the next input is asked. Stop input does just that. There can be other actions mentioned as well. There is now also a Calculate All button. When you click it, Quaestor will try to calculate all blue entities within your solution.
| Info |
|---|
To |
In this case only Ship configurator (= goal) is available.

Figure 6: Select a process with the Process manager
Select this task and press the button to start the process. Next Quaestor will request you to provide a name for your design configuration (a Taxonomy solution) for example “Test ship configurator”, see Figure 7.

Figure 7: Provide a solution title
After you have provided a solution title and continue, a structure is built in the tree of the Workbase starting with the first node (Entity) equal to the name of your solution title. This is followed by an Entity "Ship configurator” and a red Entity “Ship design”.
Furthermore the list view (on the left) shows a value for "knowledge base version", see Figure 8.

Figure 8: Start screen after providing solution title
In other words, the ship configuration is started using Ship_configurator.qkb knowledge base version "1.0" (in this example) and the minimum required structure is built up.
4.2 Select process step options that you want to perform
An options window appears to select the main process steps you want to perform, see Figure 9.

Figure 9: Options window; select the process steps you want to perform
If you want go through all process steps you have to select all of them (recommended for this tutorial). Please note that you can also decide to carry out only a part of the analysis steps. When you want to add other steps later, simply go to the Entity “Ship configurator”, press the "Accept input & Continue" button and the options window will reappear.
Please note Quaestor automatically checks dependencies between process steps. For example, select “Intact stability calculation” only. Now Quaestor automatically selects “Mass calculation” because “Intact stability calculation” apparently requires information from “Mass calculation”.
4.3 Select optional Entities “Decks” and “Bulkheads”
After selecting the process steps (for this tutorial we assume you have selected all) some Entities are added to the tree structure in thetree view. Moreover, the Entity “Lay out” is in focus and another option box appears. The number "2" behind Entity name “Lay Out” indicates two optional Entities are available below Entity “Lay out”. Now, you can select the optional Entities “Decks” and “Bulkheads” as a child of Entity “Lay Out”, see Figure 10. Please select “Decks” and “Bulkheads” and press “Ok”.

Figure 10: Selected process steps are presented in tree structure
Please note; after selecting both optional entities the number "2" behind Entity name “Lay Out” is not visible anymore. By pressing each plus sign (for instance in front of Ship design) you can open the tree structure and use the minus sign to close it.
4.3.1 Entity colors
During a dialogue Entities can have three kinds of colors, each with their own meaning:
- A red colored Entity means that user input is required within the Entity or Entities below, to determine all information in the red Entity;
- A blue colored Entity means that no more user input is required within this Entity; nevertheless some information is not yet determined. A reason can be that first information in other Entities has to be determined.
- A black colored Entity means that all information within the Entity is determined, thus no user input is required and or parameters has to be calculated.
4.3.2 Navigate through process
At the same time you started a new solution, the process buttons change their status and names. When you press the active buttons "Accept input & Continue" and "Stop Process", this is exactly what will happen. When you press the "Stop Process" button, the process is stopped. Press "Restart Process" button to restart your solution. To start the process at a given position, select this position and press the "Restart Solution here" button, etc.
In the overview you also see the "Calculate" button. Pressing this button, Quaestor will try to calculate all blue Entities within your solution.
...
perform an analysis, carry out changes, etc. the Quaestor process has to be started by clicking Data input. The process is active when the |
...
Next button is shown and stopped when the |
...
Data input button is shown again. |
In Generalgeneral, performing working through the process is very straight forwardstraightforward. You can provide input values that are presented in the Workbase either in white or light blue and pressing the "Accept input & Continue" button (or press the Enter button)click Next. You are guided in a “logical sequence” through the whole conceptual design process (for this Ship configurator) as developed by the knowledge engineer (the developer of the knowledge base).Please note that you
| Info |
|---|
You can always decide to carry out only part of the conceptual design steps or provide the input in a different order. Just go to the |
...
pertaining parts in the tree and continue. Any relation between necessary input and steps in the process is taken care of by Quaestor. In other words, when input is required, it will eventually be requested. Furthermore, it is shown by the colors of the |
...
entities. |
4.4 Provide input values for Entity Main Dimensions
...
Overview
Content Tools