Page History
...
For this tutorial, the knowledgebase from tutorial 1 is used. You can either use your own (verified) knowledgebase, or download it here: [Tutorial 2 Start]
2 Background information: TeLiTab data model and
...
Quaestor object
TeLiTab is a term that will be used quite often in this tutorial. Therefore, an elaboration on the subject is in order in this very early stage for the tutorials.
...
Every level of a TeLiTab contains list items and an optional table. The table can be omitted, but if there are no list items present at a certain level, a '0' is required (like above in the resistance telitab). Parameters and case numbers are written between double quotes (""), values are not but strings with spaces in it should! For all syntax aspects please go to: TeLiTab
Quaestor ObjectA Quaestor object contains A Quaestor Object contains a set of data, either static (only data, e.g. a speed power curve or a list of components) or dynamic, and represented as TeLiTab. An object can operate as a computational model, (requesting input and providing output) fulfilling the role of a function or subroutine in an assembled model (a ‘Solution’ in the Quaestor workbase).
The use of the TeLiTab format and Quaestor objects is covered in this tutorial.
3 Creating a
...
table with the coordinates of the waterline
In order to create the geometry of your ship, you will need an object that contains frame numbers and relative, dimensionless widths. To keep the knowledgebase arranged logically, we will create a new class: “Geometry”.
...
Creating classes is covered in tutorial 1.
...
The ship is defined mathematically, which makes it convenient to generate. The relation between the Frame number (0 to 20) and relative width is:
...
Please also note that inside the Waterline node, the dimension of Waterline is stated a Function, which is the correct conclusion drawn by Quaestor.
...
4 Telitab of the Waterline object
In the solution Waterline, select the cell containing Object, right-click and select Selection to Clipboard, or press F3.
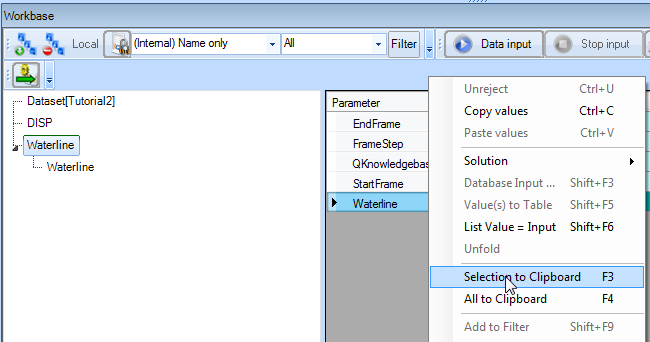
The Workbase Clipboard is opened.
...
The TeLiTab format used to describe the contents of the object is clearly visible. There is 1 list item, named Waterline. This is a telitab (2nd level), containing 0 list items and a table with 2 parameters, Frame and Rel_B. The case numbers are shown between double quotes ("").
5 Managing solutions
To clean up the Workbase from some of your trials, select the solution in the Workbase you want to delete, right-click and select Solution -> Delete or press Del. Click yes to confirm. The solution has been deleted from the workbase.
...
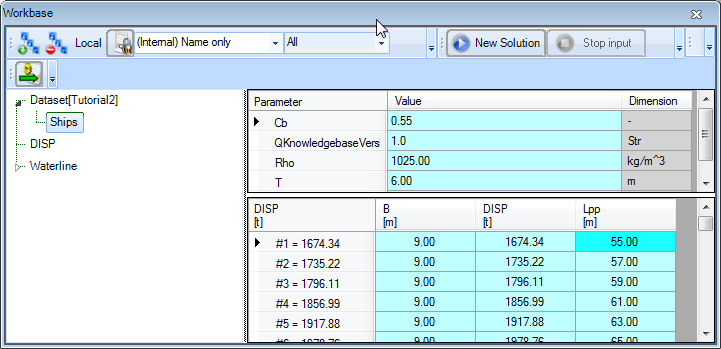
The object Ships is now filled with all the variations in length and width:
8 Accessing Accessing data in an object
- In the class
Geometry, create a new relation:
...
Attributes are either separated by a space or by a hard return, not by a comma. The meaning of the entered attributes will be explained at the end of this tutorial.
9 The Process Manager
The main procedure to create solutions with an existing dataset is through the use of the Process Manager. In the Process Manager, datasets and top goals can be selected to create new solutions. Furthermore, existing solutions, macros or scenarios (these terms will be explained in another tutorial) can be restarted. First, we'll make sure our top goal B_Frame can be selected in the Process Manager.
...
- In the Knowledge Browser, drag the parameter
B_Frameto the class Top Goals/Undefined.
| Note |
|---|
Parameters can always be exchanged between classes, there is no influence on the behaviour of Quaestor except that parameters in the Top Goals/Undefined class are visible in the process manager. |
...
- In the Process Manager, select Ships:#1 as dataset and B_Frame as task. Click the Compute B_Frame button. Data that is available in the dataset is proposed together with data still to be given (figure 11).

Figure 11 Data that is available in the dataset is already filled in
- A solution
B_Frame[Ships: #1]is created. - Because you can only give a range when you recalculated a solution, first provide one value for
Frameand
...
- click Next. Press
- until the warning goes away.
However, we do want to create a case matrix (calculate all possible combinations, see tutorial 1), and continue with the calculation. Therefore, after the solution is finished, restart in and provide a range for Frame: 0(2)20. The result of the calculation is a table with B_Frame for every ship of the dataset over the full length (frame 0 to 20).
...
Overview
Content Tools