Page History
...
- You will be asked whether
StartFrameis an Object. Say no; - Hereafter you will be asked whether
StartFrameis a Goal parameter or Input. Say no, because you want to provide this as input for theWaterlineobject; - These questions are also asked for
FrameStepandEndFrame. Say no to the Object question and no to the Goal parameter question. These values are input to the object.
- The three new parameters all are dimensionless and should be of the VR type.
The syntax of this relation defines a Function that creates an object Waterline including Rel_B and Frame the moment it is initiated (when you do a calculation). The first parameter, @Rel_B, makes sure Rel_B is the top goal (calculated value). The second parameter, @Frame, makes sure Frame is the input for the function, the expression following @Frame: STR$(StartFrame) + "(" + STR$(FrameStep) + ")" + STR$(EndFrame) defines what should be asked as input to create the range input within the Waterline object.
...
- In the solution Waterline, select the cell containing Object (as in figure 3). Press F2, which is the shortkey for edit.
...
- , right-click and select Selection to Clipboard, or press F3.
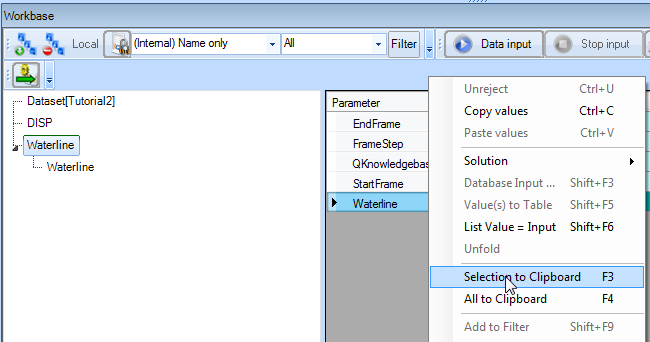
The Workbase Clipboard is opened.
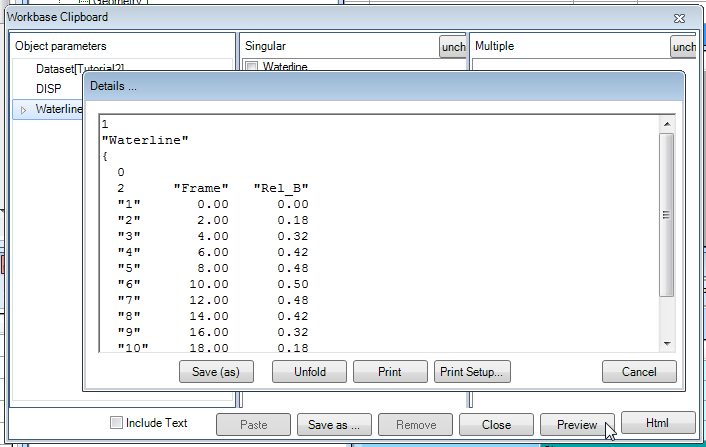
- Click on Preview and the contents of the clipboard are shown. These contents consist of the contents of the
Waterlineobject: Click Cancel after this.
 object Waterline are shown, see figure 4.
The TeLiTab format used to describe the contents of the object is clearly visible. There is 1 list item, named "named Waterline". This is a telitab (2nd level), containing 0 list items and a table with 2 parameters, Frame and Rel_B. The case numbers are shown between double quotes ("").
To clean up the Workbase from some of your trials, welect select the solution in the Workbase you want to delete, and press del (or  -> solution -> delete), see figure 6right-click and select Solution -> Delete or press Del. Click yes to confirm. The solution has been deleted from the workbase.
Figure 6 Deleting a solution in the Workbase

| Note |
|---|
Manipulating solutions only works when Quaestor is not in calculation mode. Press Stop Input until this button becomes disabled to exit calculation mode. |
6 Creating an object in the dataset
In the dataset, an object can be used to store static data in a Quaestor knowledgebase. This can be very convenient, especially when large amounts of data need to be stored as input for calculations. An object can be created at any time and it can be filled with data later, either manually or as a result of calculations.
In this paragraph, an object is created that will be given contents later on. We will create the object Ships.
...
- In the Knowledge Browser, select the class Top Goals/Undefined. In the right hand side,
...
- right-click and select New Parameter/Function (or press Ctrl+I). Name the Object
Shipsand select the type: Object.
Unlike Unlike the Waterline object, which was defined by a function, the object Ships does not yet meet the validity conditions.
...
- In the
...
- Properties window, change the Determined by field to OBJ: Value from Object/Database.
Ships is now a valid object in the knowledgebaseknowledge base, but is not yet present in the dataset in the Workbase. We'll have to add it.
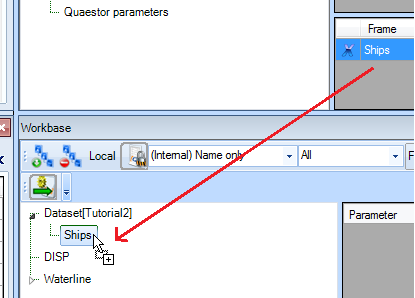
![]() In the Workbase, select the Dataset node. In the Knowledge Browser, the object Ships and select Parameter to DataSet (or Ctrl+O), or drag the Ship object to the Dataset, see figure 7.
In the Workbase, select the Dataset node. In the Knowledge Browser, the object Ships and select Parameter to DataSet (or Ctrl+O), or drag the Ship object to the Dataset, see figure 7.
Note that you could also simple drag and drop the parameter to the dataset.

- Drag the
Shipsparameter in the Knowledge Browser to theDatasetnode in the Workbase.
The object is now added to the dataset, Figure 7 If the dataset node is selected in the workbase, the object can be added
The object is now added to the dataset, and can be filled with content content.
7 Adding content to a data object
Our data object should contain all the ship variations produced in tutorial 1. Therefore, we will copy the results of the second DISP DISP solution (with the variations) to the object Ships using using the clipboard.
...
- In the Workbase,
...
- right-click on the
DISPsolution and select All to
...
- Clipboard (or press F4).
...
- The Workbase Clipboard
...
- now pops up. Click on Preview. The contents of the
DISPsolution are now displayed. You temporarily have to use a workaround now, because the Paste function is not yet implemented. Press Ctrl+A followed by Ctrl+C to copy the contents to the Windows clipboard. Click Cancel and close the clipboard. No need to save the values in there. Then right-click on theShipsobject in the Dataset and select Database Input or press Shift+F3. In the pop-up window that appears, select Use Editor and click Continue. In the window that appears next, press Ctrl+V to paste the data in the object. Click OK. Select Yes to All and click Continue.
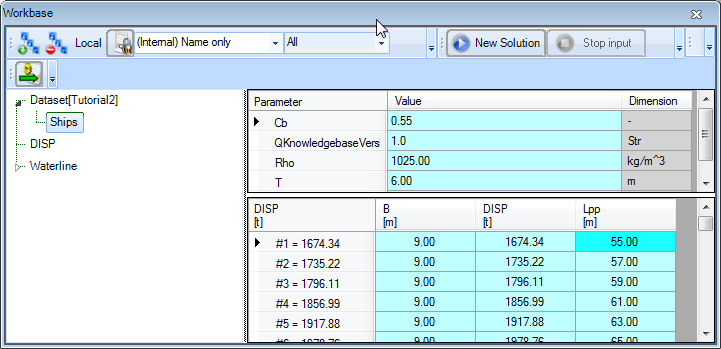
The object Ships

Figure 8 The clipboard window is used to copy and paste static data
The object ships is now filled with all the variations in length and width. You can close the Workbase clipboard. It will ask you whether it should be cleared, say yes because you do not need the data in the Clipboard anymore.:
8 Accessing data in an object
...
Overview
Content Tools