Page History
Adding parameters
The entity Main Dimensions is the first one that you will add contents to. These contents consist of Quaestor parameters.
During the intended calculation, the user will be asked to provide input values in entity Main Dimensions for the following parameters:
Parameter name | Dimension | Reference (i.e. comment) |
| [m] | Length over all |
| [m] | Length between perpendiculars |
| [m] | Width over all |
| [m] | Moulded depth of ship |
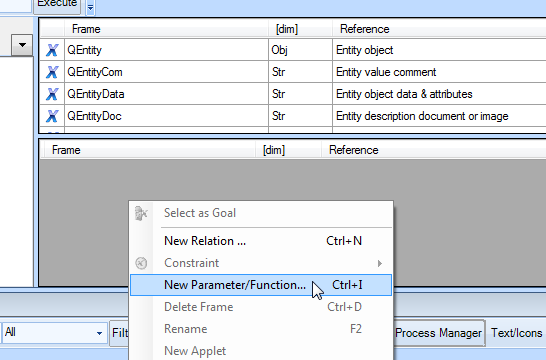
- Right-click in the right field of the Knowledge Browser and select New Parameter/Function.., or press Ctrl+I.
A small window opens, where you can enter the name and type of the parameter:

- Enter the name
Loaand click on Value.
| Info |
|---|
A valid parameter name should not contain special characters and spaces. |
The created parameter Loa is placed in the Knowledge Browser with a red cross in front of it.
If you have experience with creating 'classical' (i.e. taxonomy-free) Quaestor knowledge bases (see the Tutorials on Quaestor basics) you will know that a parameter should always have a unique name and a dimension and the system should “know” how to determine the value of the parameter.
- Select
Loain the Knowledge Browser. - In the Properties window, enter
min the Dimension field,Length over allin the Reference field, and set Determined by to VR: User only.
| Info |
|---|
A special remark has to be made concerning the Determined by field for use with taxonomies. When you are sure that parameters should be requested as input, change the Determined by field to VR. When you add an entity-relation or connect a relation to a parameter (see next section), leave the Determined by field to USR or USL. Quaestor will then make sure the added or connected relation is used and the red cross for the parameter will disappear the moment the relation is added or connected. |
- In the same way, add the VR parameters
Lpp,BoaandDmin the Knowledge Browser. All havemas dimension.
Creating classes
You can create tree nodes in the Knowledge Browser, in order to group parameters and relations.
| Note |
|---|
| Classes are just a way to order your knowledge and has no functional meaning during the use of knowledge. |
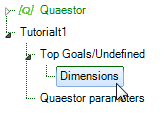
- Right-click on the
Top Goals/Undefinednode in the tree of the Knowledge Browser and select New Class. Name itDimensions.
When you have created classes, you can simply drag and drop the parameters and/or relations to the desired class.
- Drag the parameters that you have just created to the
Dimensionsclass.
If you define a parameter while a certain class has the focus, the parameter will belong to that class.
Including parameters in an entity
Now we have created parameters in the Knowledge Browser , the next step is to include these parameters in entity Main Dimensions. Two ways are available to include parameters in an entity:
- Include parameters by a drag/drop action between Knowledge Browser and Workbase.
- Use the option Include Parameters from knowledge base while creating a new entity.
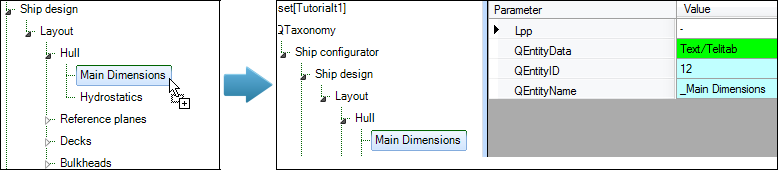
- Using the first method, drag parameter
Loato the entityMain Dimensions(underLayout>Hull):
In this section you will develop the ship design process further.
- Include the following entities:
| child of | Singular obligatory |
| child of | Singular obligatory |
| child of | Singular obligatory |
| child of | Belongs to group of single optional Entities |
| child of | Belongs to group of single optional Entities |
How to include entities is described in the previous sections.Th result so far should look like this:
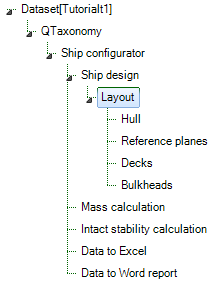
A ship design always contains a layout with at least a hull and defined reference planes. The entities Decks and Bulkheads will be optional for a user to include in their ship design.
Entity Hull
- Include the following two entities:
| child of | Singular obligatory |
| child of | Singular obligatory |
Entity Main Dimensions
The user will be asked to provide input values in entity Main Dimensions for the following parameters:
Parameter name | Dimension | Reference |
Loa | [m] | Length over all |
Lpp | [m] | Length between perpendiculars |
Boa | [m] | Width over all |
Dm | [m] | Moulded Depth |
2.3.2.1 Creation of parameters
Right click in the right field of the Knowledge Browser and select “New Parameter/function..”, see Figure 49, which opens the Parameter, Object, Function or Document window.

Figure 49: Include new parameter

Figure 50: New parameter, object, function or document window
You can type a name in the window and select whether it is a Value, String, Object, Function or a Document. Type in here “Loa” andselect Value. Please note a valid name should not contain special characters and spaces. The created parameter “Loa” is placed in the Knowledge Browser with a red cross behind.
When you have experience with creating Quaestor knowledge bases (see Knowledge engineering getting started course Part 1 (PDF document) and the Tutorials on Quaestor basics ) you will know that a parameter should always have a unique name, dimension and the system should “know” how to determine the value of the parameter.
So, the properly define the parameter(s) select “Loa” in the Knowledge Browser and provide a dimension in the dimension field of the Frame Viewer, see Figure 33, in this case meter “m”. Furthermore provide a reference text in field 5 of the Frame Viewer as explanation for the user of your knowledge base, for example “Length over all”. Be sure that the reference/radio button is switched to the reference mode. Finally you can indicate that “Loa” will only requested to the user and will not be determined by a relation. Select inthe Slots & Properties window “VR: User only” in the “Determined by” field.
A special remark has to be made concerning the “Determined by” field for use with Taxonomies. When you are sure that parameters should be requested as input, change the “Determined by” field to VR. When you add an Entity-relation or connect a relation to a parameter (see section2.3.3.2 below) leave the “Determined by” field to “USR” or “USL”. Quaestor will make sure the added or connected relation is used and the red cross for the parameter will disappear the moment the relation is added or connected.
In the same way you have to include the VR parameters “Lpp”, “Boa” and “Dm” in the Knowledge Browser.
2.3.2.2 Create classes to order your knowledge
You can create tree nodes in the Knowledge Browser, in order to group parameters, objects and relations. This is only a way to order your knowledge and has no functional meaning during the use of knowledge.
Right click on the “Top Goals/Undefined” node in the tree of the Knowledge Browser and select New Class. Now you can define a name in the window that will appear, see Figure 51. For example the class node name “Dimensions” where we can put our created parameters from above.

Figure 51: Create nodes in the class tree
You can use a point to create sub-classes. Thus, typing “Test. Example” gives Figure 52.

Figure 52: Make sub classes by using a point
When you have created the classes you want, you can simply drag and drop the parameters and/or relations to the desired class.
2.3.2.3 Including parameters in an Entity
Now we have created parameters in the Knowledge Browser. The next step is to include these parameters in Entity “Main Dimensions”. Two ways are available to include parameters in an Entity:
- Include parameters by a drag/drop action between Knowledge Browser and Workbase.
- Use option “include parameters from knowledge base” while creating a new Entity.
The first method is to include parameters in an Entity with the drag/drop functionality from the Knowledge Browser into the Workbase. This method will be explained by including the parameter “Loa” in the Entity “Main Dimensions”.
Select the Entity “Main Dimensions” in the Workbase to put the focus in the Workbase on the content of this Entity. Then you have toselect the parameter “Loa” in the Knowledge Browser, hold the left mouse button and move the mouse to parameter list of the Entity “Main Dimensions” in the Workbase, see Figure 53. Now the Entity “Main Dimensions” contains the parameter “Loa”.

Figure 53: Include parameters in an Entity with drag drop functionality
- Do the same for “Lpp”, “Boa” and “Dm”, see Figure 54.

Figure 54: Parameters included in Entity "Main Dimensions"
...
Overview
Content Tools