Page History
Tutorial 1 Getting started
| Learning goals
| Prior knowledge |
...
To create your first knowledge base, select
- Select File -> New -> Knowledge base or click on the leftmost button in the toolbar.
The screen changes to the main Quaestor knowledge engineering screen:
...
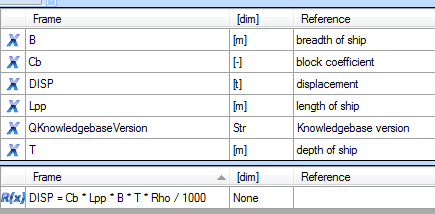
Create a new class, named Main Dimensions, in which the following ship parameters are to be stored.
Lpp: Length between perpendiculars
B: Moulded breadth
T: Draught from keel to Construction Water Line
- Right-click on Top Goals/Undefined and select New Class from the popup menu. Give the class the name
Main Dimensions.
Sub classes can be defined by right clicking on any class name and again selecting New Class.
...
The class is now shown in the knowledgebase tree, and you can add the parameters Lpp, B and T.
Select the class Main Dimensions and select Knowledge -> New parameter/function from the main menu. Alternatively, click in the right part of the knowledge browser, and select New Parameter / Function (Ctrl+I). Give the parameter the name Lpp and click the Value button to select its type. Repeat these actions for the parameters B and T.
...
The added parameters now appear in the right part of the Knowledge browser like this:
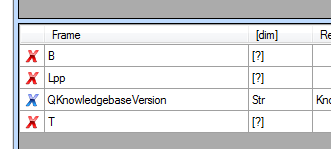
A red cross draws your attention to the fact that a parameter is not yet fully defined for the system to use it.
The first requirement is already satisfied, so let's assign dimensions to the parameters.
- Select the Lpp row in the Knowledge Browser Window. In the Properties window, scroll down to the Dimension row and change the
?intom, the dimension forLpp(meters).
You can also add a reference to for a parameter. A proper reference is important, as users of the knowledgebase may not be certain of the exact meaning of the parameter. Please also read Documentation of knowledge for more details.
- Scroll down to the Reference row and enter "length of ship".
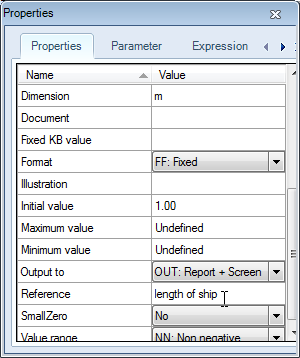
- Assign a dimension and a reference to the other parameters
BandT, just as described above. Of course, the breadth and depth of the ship are defined in meters.
Now only the last requirement for valid parameters has yet to be fulfilled: a way to be determined (input from the user or defined by a relation). This qualification can be provided in the Properties window.
- Select the parameter
Lpp. In the Properties window, scroll down to the Determined by row. Change the value to VR: User only, as the parameter Lpp is input (instead of defined by a relation).
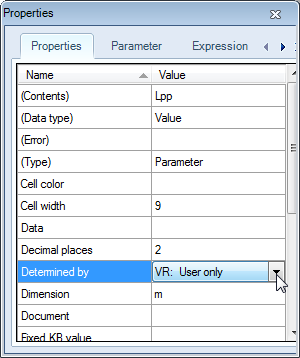
Notice that now, the status of the Lpp parameter has changed to
...
to show that Quaestor knows enough about this parameter to use it in a computational model. Now make sure that B and T are determined by VR (Value Requested):User only too.
VR: User only too. By the way, VR stands for Value Requested.
Note that above you have explicitly added Lpp, B and T as parameters to the knowledge base. You are also able to implicitly add parameter parameters by creating relations that contain new parameters. Quaestor will automatically add these new parameters to your knowledge base (so, implicitly). You will encounter this in the following section.
- Save your knowledge base with the name
Tutorial 1, by selecting File -> Save as.
4 Creating relations
In order to define the loading capacity of the ship, it’s important to know the kind of water (Salt or Fresh) the ship will sail in. Therefore, you're going to add some relationsand constraints, and make sure the user can select the watertype. Two relations must be added, one for salt water and one for fresh water.
- Select Top Goals/Undefined in the knowledge browser, right click in the right hand part of the window and select New Relation (Ctrl+N). In the upper part of the new window, delete any proposal (Quaestor may have filled in the last selected parameter), and enter
Rho = 1025
(belonging to salt water), and click Save:
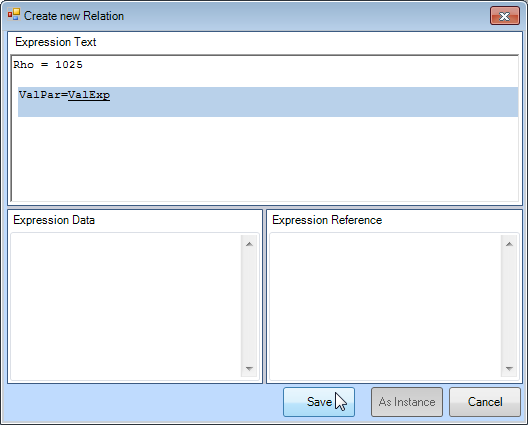
Note that when you enter a relation, Quaestor provides as much help as possible by means of the Help Checker. This checker shows what to expect (in this case a Value or an Expression, ValExp). After saving a relation, the Help Checker will check the syntax for possible errors, and shows a warning message when something is wrong.
Because of entering the relation, the parameter Rho has automatically been created. For Rho to be a valid parameter, a dimension should be assigned.
| Note |
|---|
The parameter is automatically created in the Class in focus when saving the relation! |
- Provide a reference for
Rhoand assign it the dimensionkg/m^3.Rhois now a valid parameter. Furthermore, make sureRhois determined by SYS: System/Equation, as a relation is used to determineRho.
What follows now might seem a bit unconventional: a second relation is given for Rho. This is a nice example of how Quaestor works: in a calculation, Quaestor can find numerous calculation paths and automatically chooses the most appropiate one, based on constraints and available data.
| Note |
|---|
| An infinite number of relations can be assigned to one particular parameter. |
- Add the following relation (belonging to fresh water) in a similar way as described above:
Rho = 998
5 Creating constraints
The two relations for the density of the water are only valid for their corresponding watertype. Therefore, a constraint is added to each relation. A constraint is simply a restriction for the validity of the relation.
...
Click Top Goals/Undefined in the
...
Knowledge browser: all relations in that class are shown (this will work for any class). One can always edit a relation by selecting it and pressing F2 (
...
or right click and select Edit). This is also a useful method to find out which relation you actually selected.
...
- Right click on the relation
Rho = 1025
...
- in the Knowledge browser and select Constraint -
...
- > Add New. In the upper part of the new window enter the following constraint:
and press Save (figure 7).

...
Watertype$ = "SW"
and click Save:
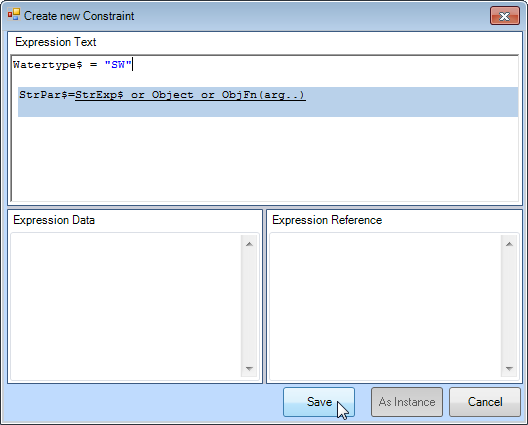
The constraint is now added, and a parameter named Watertype$ has been created. The $ at the end of the parameter name makes sure Quaestor recognizes it as a String value, and the dimension Str is automatically assigned (see also Quaestor syntax). We have to assign a determined a Determined-by value to make it a valid parameter.![]()
- Make sure
Watertype$is determined by VR: User Only, as the user should provide the information concerning the water type.
We repeat Repeat the process for the other relation: .
...
- Add the constraint
...
Watertype$ = "FW" to
to the relation Rho = 998.
Note that the expression editor
...
assists you with the presentation of existing parameters and intrinsic function
...
s.
Both relations are Both relations are now connected to the corresponding watertype by means of the value of the string Watertype$. Note if
Whenever Rho is needed in the calculation progressprocess, Quastor Quaestor will note that the watertype is needed to determine the value of Rho, and will ask the user for this value (because it is assigned assigned to be User Onlyonly).
When you select TIP: By selecting a parameter in the knowledge base and then double clicking the box below the knowledge base tree, the relations defining upper list, the relations of that particular parameter are visible (figure 8).:
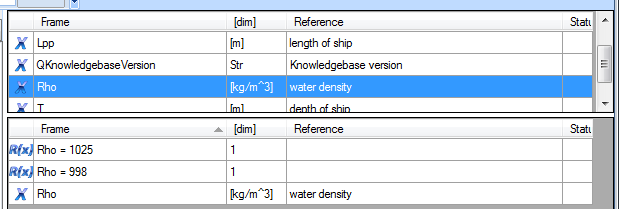
Moreover, when you select a relation in the knowledge base, and double click that box, the parameters that can be calculated by the selected relation are shown.
When single clicking the box, all connections to the parameter or relation are shown. See also information on the Knowledge Browser.

lower list, the constraints for this relationship are shown:
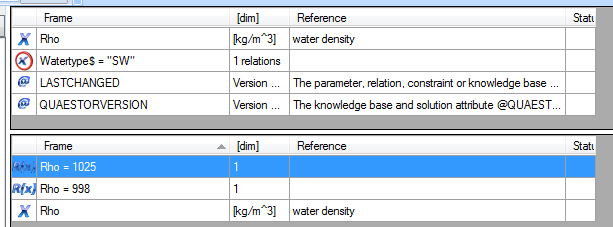 Figure 8 When selecting a parameter and double clicking the box indicated by the blue arrow, all relations defining that parameter are shown.
6 Creating a dropdown menu
Because there are only two possible values for Watertype$ (SW or FW), it's easy to integrate a dropdown box.
...
- Select
Watertype$in the
...
- Knowledge Browser, select the Parameter tab and in the Reference box enter the following lines:
FW<EQ>Fresh Water
SW<EQ>Salt Water
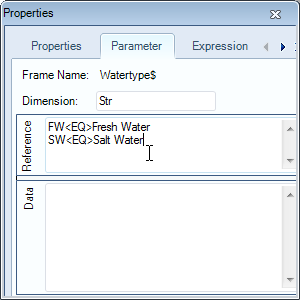

Figure 9 A dropdown box is created by entering this information in the reference slot of the frame viewer
The use of a dropdown box will be clear in a later stage of this tutorial, when calculations are made. Note that you can add the @EQEXPLAIN attribute to in the Data box ('data slot') of the Watertype$ parameter (see Frame Viewer for data slot) in order to manipulated that display only "SaltwaterSalt Water" and "FreshwaterFresh Water" are shown shown in the dropbox (so without SW and FW).
7 Creating a relation for the displacement
On the basis of the earlier defined parameters and the block coefficient Cb , the displacement of the ship can be calculated.
...
- Add the following relation to the class Main Dimensions:
DISP = Cb * Lpp * B * T * Rho / 1000
which defines the displacement of the ship in tons.
Note that two new parameters are created: the block coefficient Cb and the displacement DISP. In order to keep the knowledgebase meaningful, it is necessary to provide references, dimensions and determined-by values for these parameters.
...
- Provide references, dimensions and determined by values for
CbandDISP.Cbhas no dimension (-),DISPshould be in tons (t). Just press
...
- OK if Quaestor warns that tons is no base dimension (kg), it is just to inform you. We covered this by dividing
DISPby 1000. The determined-by values should be VR: VR User Only forCb, and SYS: System/Equation forDISP, as the block coefficient is input and the displacement is determined by a relation. Verify that all parameters now have a blue cross instead of a red one in front of them:
8 Creating a solution
Let's perform our your first Quaestor calculation. A solution is always determined by one or more Top Goals. A top goal is a parameter (or object) that is your final calculation target, in this tutorial it's the displacement of the ship.
...
- Select the class Main Dimensions in the
...
- Knowledge browser. Double click the parameter
DISP.
Note that the ![]() sign the cross in front of
sign the cross in front of DISP changed to ![]() to
to ![]() , indicating that it's a top goal for the calculation.
, indicating that it's a top goal for the calculation.
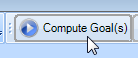
Calculations and solutions are managed in the Workbase. Here, solutions can be created, redone (with different data), examined and deleted.
...
- In the
...
- Workbase window, click
...
- the Compute Goal(s) button to start the calculation with top goal DISP.
The calculation progress is started, and Quaestor first collects wants to collect all input data (figure 10).

in the Workbase window:
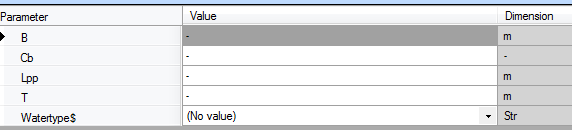 Figure 10 Input data for the calculation
Entering data is easy: just type a value for each selected parameter and press enter to switch to the next one.
...
- Enter the following data for our first calculation:
B = 10 Cb = 0.55 Lpp = 60 T = 6 Watertype$ = SW (Salt Water)
Note that the input of Watertype$ consists of a dropdownbox, which we created in (4), see figure 11.

above:
 Figure 11 Watertype$ can be selected in a dropdownbox
After providing the data you have to press the ![]() button or "Accept input & Continue" have to press the Next button to continue. The actual calculation is started now , and the right-hand side of the workbase shows the situation of figure 13. During the calculation, the box indicated with the blue arrow shows the status of the calculation.Because and because this is a very simple example, the final state is alost immediately shown.
button or "Accept input & Continue" have to press the Next button to continue. The actual calculation is started now , and the right-hand side of the workbase shows the situation of figure 13. During the calculation, the box indicated with the blue arrow shows the status of the calculation.Because and because this is a very simple example, the final state is alost immediately shown.

:
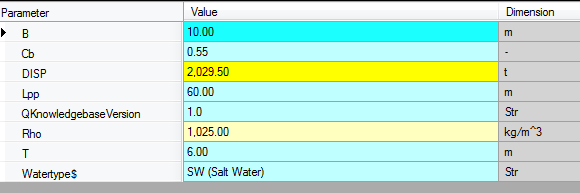 Figure 13 Status of the calculation and solution
The top goal (DISP) is shown, together with all parameters that were used for the calculation. With these input values, the displacement of the ship is about 2030 tons.
...
Overview
Content Tools