Page History
...
In this document all reference principles for knowledge in a Quaestor knowledge base is described. This information is particularly interesting for knowledge bases to be used by End-Users and Domain Experts.
For further detailed information on the use of images and documents, also read Image Management.
The document is divided into two parts:
- The ways to create documentation and reference for your knowledge (parameters, relations, constraints, functions);
- Details of how the documentation and binary data is presented in Quaestor and the web-based version;
1. Documentation and reference for your knowledge
Knowledge in Quaestor is stored in a frame. A frame can contain the following types of knowledge:
...
Information on frames (knowledge) is presented and can be modified in the Knowledge Browser, Frame Viewer and Slots & Properties. For specialised presentation aspects most of the time Attributes are used.
1.1 Documentation and reference for parameters
...
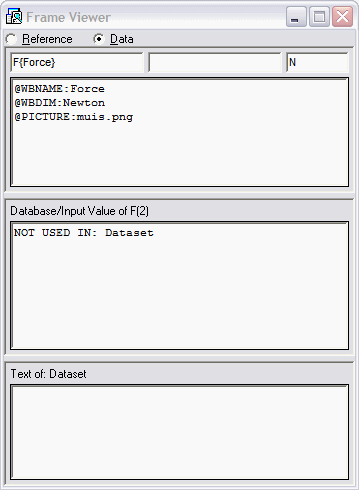
Optionally you can create a presentation name by using the @WBNAME attribute. This attribute should be placed in the data slot of the Frame viewer. For example, for parameter F you can give a presentation name @WBNAME:Force. The alternative presentation name is also presented as {..} behind the parameter name in the Knowledge Browser. Note that you are able to use special characters in the presentation name (such as spaces etc.) which you are not allowed to use in the parameter name itself.
...
A proper dimension is based on (a combination of) SI dimension(s). Available SI dimensions are presented in the Knowledge Browser (Quaestor>Dimensions).
Optionally you can create your own presentation dimensions by using the @WBDIM attribute in the data slot of the parameter. For example, for parameter F you can give the unusual dimension @WBDIM:Newton. Please note that you should have a normal dimension at first before defining the alternative one. The alternative dimension is presented right away.
...
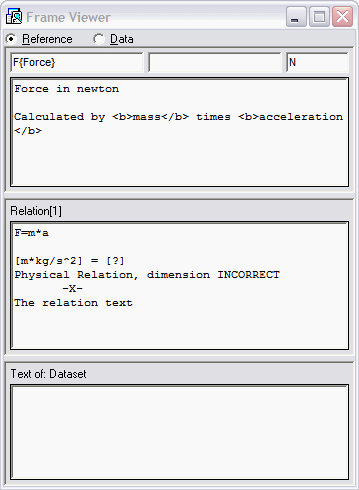
Please note that the first line of this description is handled in a unique way. This line is used as full reference text when selected in the Workbase (and the web-based dialogue) (see for further detailed in section 2 below).
The reference can be written in the reference part of the Frame Viewer. This is simple ASCII text.
...
Optionally you can use HTML code in the additional text after the first reference line. In the Explanation window (see section 2) this is presented as nicely formatted html text.
Furthermore, advanced syntax functionality can be used to define different reference text for a parameter when it is part of different objects. You can recognise that the parameter has a different reference text in different object by the fact that the text in reference part of the Frame Viewer is italic. Please note that this functionality is a bit special. You can edit the text of the parameter for the different objects by selecting the parameter in the relevant object in the workbase (for instance in the data set or in a solution) and change the text it presents. What is also possible is to press F2 when you your cursor in the Frame Viewer to open the content in a separate text editor. When you have already used the syntax, you will discover this in the external editor (it will never be visible in the Quaestor GUI itself). The syntax works as follows:
...
This if followed by the generic description (in orther than defined objects):
=misc=$Description
With Discription the With Discription the general discription. Hereafter a description can be defined for within every object:
=ObjectName=$SpecialDescription
With ObjectName the With ObjectName the name of the object it is valid for and SpecialDescription the and SpecialDescription the description in this object. For example, the parameter VOL can be used with different definitions in theSPEEDTRIAL object and POWERINGthe SPEEDTRIAL object and POWERING_MODEL_TEST_DATA objectDATA object, both in the solution and in the data set below the Ships object the Ships object entry:
><
=misc=$Displacement volume on trials
From the speed trial data.
=SPEEDTRIAL=$Actual displacement volume on trials
This is the actual displacement volume corresponding with the actual loading condition during the trials.
Although the ship should be ballasted as accurate as possible on the specified trial condition, small differences are to be expected. Provide the actual value so that small displacement corrections can be made relevative to the specified displacement on trials.
=POWERING_MODEL_TEST_DATA=$Actual displacement volume model test
Note that the displacement volume is used to determine whether the modeltest can be used in the analysis for the conversion of speed trial results to another draught or loading condition.
The actual displacement should be within a boundary of 5% of the model test volume. If this is not the case, the model test can and will not be used for the trial volume correction to other loading conditions.
=Ship.SPEEDTRIAL=$Actual displacement volume on trials
This is the actual displacement volume corresponding with the actual loading condition during the trials.
Although the ship should be ballasted as accurate as possible on the specified trial condition, small differences are to be expected. Provide the actual value so that small displacement corrections can be made relevative to the specified displacement on trials.
=Ship.POWERING_MODEL_TEST_DATA=$Actual displacement volume model test
Note that the displacement volume is used to determine whether the modeltest can be used in the analysis for the conversion of speed trial results to another draught or loading condition.
The actual displacement should be within a boundary of 5% of the model test volume. If this is not the case, the model test can and will not be used for the trial volume correction to other loading conditions.
1.1.4 Optional parameter illustration connected through Slots & Properties
An illustration connect to a parameter is presented as such in the Explanation window.
There is a difference between an illustration connected to a parameter by means of the dialogue in the Slots & Properties window and by means of a connection to a binary (see hereafter and document Image Management ). An illustration connected through Slots & Properties, is connected to an existing file on your disk. This reference is lost when you move the knowledge base to another place on your disk. Therefore this approach is only useful when the reference is made to files that will always be distributed with the knowledge base.
...
When you use the document connection in Slots & Properties, Quaestor will Quaestor will use an absolute path. However, since Quaestor 2since Quaestor 2.46.2 you are able to link to a "relative" HTML path to enable storage of "Getting started" documentation with the knowledge base.
...
The linking is done by using the @DOCUMENT attribute and the following syntax in the data slot of the parameter that you want to refer to this documentation (usually thethe QKnowledgebaseVersion parameter):
@DOCUMENT:./<starting file.html>
...
We strongly advise to use the QKnowledgebaseVersion parameter as your starting point for external data for the following reasons:
- The menu item Help>Show documentation of... is connected to this parameter;
- QKnowledgebaseVersion by default has the @SHOWASFIRST attribute;
1.1.6 Optional parameter binary connection
...
- By including it in the frame of the parameter and place a reference to the file name in the data slot of the parameter;
- By creating a reference to the QBinaryID in the QBinaries object in the dataset;
In both cases the reference is defined by means of the @PICTURE attribute although all types of binaries can be connected. The reason it is still called picture is due to backward compatibility.
...
For the reference to the binary in the frame first select the parameter in the knowledge base and choose "Include binary in frame...". Hereafter place @PICTURE in the data slot of the parameter with the filename after it.
For example, for parameter F the picture "muis.png" is included as binary in the frame. By adding @PICTURE:muis.png it will be presented in the Explanation window.
1.1.6.b Reference to QBinaryID
Instead of including a binary to a single frame, you can also make a database with binaries in the Dataset of the knowledge base and refer to this data (for further information see alsoalso Image Management ).
The only difference with section 1.1.6a is that you use an additional ":" after the @PICTURE attribute and refer to the QBinaryID.
For example @PICTURE::bin1 will show the "muis.png" picture because it is available in the QBinaries data object of the dataset.
...
This is particularly interesting when you want to use a binary more than once. Furthermore, when you have created a QBinaries object containing a QBackground parameter (in the above example "Company.gif"), Quaestor will automatically show this background picture when the QBinary of the QBinaryID case is empty (see "bin2" in the example above).
...
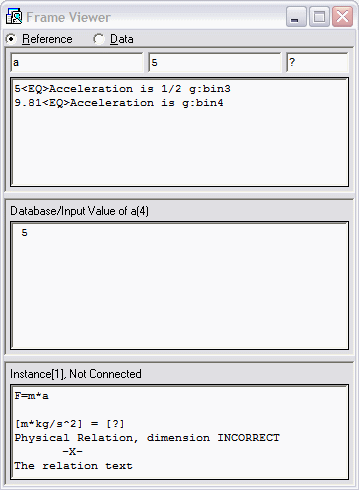
When you have used the <EQ> statement in the reference slot of the parameter to create a select list of explicit values for a parameter (see also a Tips and Tricks forum item), you are able to connect values of the parameter to a particular picture. You simply add ":bin3" or any other QBinaryID to one of your <EQ> values and when this value is selected, it will be presented as picture with the selected parameter value in the Workbase.
1.2 Documentation and reference for relations
...
In addition, you can give a reference description and connect a binary. This basically works the same as for parameters, but information is provided in the second part of the Frame Viewer.
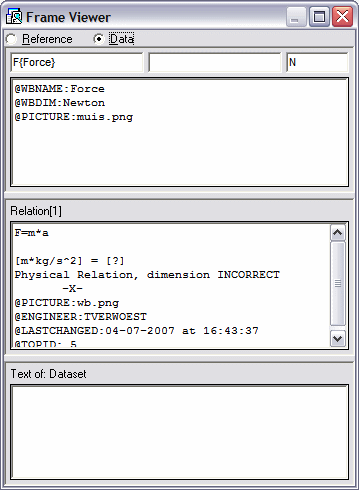
The reference text of the relation is written in the second part of the Frame viewer (see the text "The relation text" in the left side window). The binary can be included into the frame again and the link is provided by the @PICTURE attribute (see @PICTURE:wb.png in the right side window).
...
In addition, you can give a reference description and connect a binary. This basically works the same as for relations, but information is provided in the third part of the Frame Viewer.
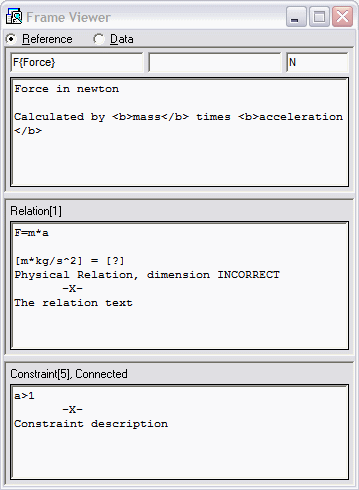
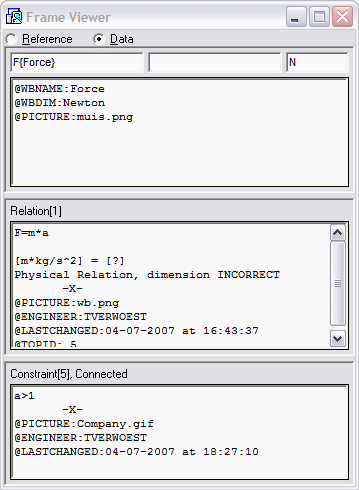
The reference text of the constraint is written in the third part of the Frame viewer (see the text "Constraint description" in the left side window). The binary can be included into the frame again and the link is provided by the @PICTURE attribute (see @PICTURE:Company.gif in the right side window).
...
Beside a description of all your parameters, relations constraints etc. you are able to group relevant parameters and relations in classes in the class tree. You can create a new class and arrange existing classes in the class tree on the left side of the Knowledge Browser and drag and drop parameters and relations in these classes.
The purpose of classes is to organise your parameters. You do this by selecting any existing class and press the right mouse button.
...
To reorder the classes you have to press the button between the forward and back buttons of the knowledge browser (field 2). This button will switch the class tree view between Class List, Domains and Class Tree view (the default view). Please note that button has the name of the view you will switch to (and not the present view). In the Class List mode you will see all classes presented in a syntax showing sub-classes after a dot. So, a sub-class of "Top Goals/Undefined" class is presented as "Top Goals/Undefined.sub-class". You can simply drag and drop the presented class entries in order to manipulate the order of classes and sub-classes. The only class you cannot move is "Top Goals/Undefined".
Please look at the KE Tutorials for more details.
3 Presentation of information
Presentation of the information is divided into two parts:
- Presentation in the Quaestor clientthe Quaestor client;
- Presentation on the web-based version;
3.1 Presentation in Quaestor
In Quaestor information In Quaestor information is of course presented all over the interface. We will concentrate on the relevant presentation for the user.
For the user there are two places where information is presented:
- The Workbase;
- The Explanation window;
In the Workbase the interaction with the user is happening. In this part the user is asked to provide input and make choices. The choices are based on the input for parameters and presented as list or table in the Workbase, optionally with indication of the relevant object in the tree view. The list in the Workbase presents either the parameter name, its presentation name or the first line of the reference text, depending on the user rights and choice for presentation option made in the Workbase.
At the same time, all type of information is presented in the Explanation window at the left side of the Workbase (see Quaestor interface for more details).
The Explanation window presents all information on the selected parameter, relation, constraint or function, depending on user rights and settings of Quaestor (just play around to see what happens).
Because there might be an information overkill, you are able to customize what you see in the Explanation tab of the Options window.
This window provides all the options related to the presentation of information for:
...
Remark:
Whether you see the complete or compact presentation of relations will depend on your user rights and the choice for compressed or complete presentation of relations in the Appearance tab of the Options window.
By default the GUI is configurated in the new style. To return to the old interface you have to change the following two settings in the Options window under the Tools menu:
Replacing the new "explanation" window with the classic "illustration with frame viewer" setup:
- Go to Tools>Options>Appearance and select "Use classic frame viewer"
- Go to Windows>Standard to get the standard windows settings
Replacing the new "continue or return to input dialogue" window with the classic "inference dialogue" :
- Go to Tools>Options>Modeller and select "Show classic inference dialogue"
...
The web-based version of Quaestor presents a sub-set of the explanation window. The only thing is presents is the full reference text and the binaries (pictures) or links to binaries.
...
Overview
Content Tools