Page History
1
...
Adding parameters to Transverse planes and Horizontal planes
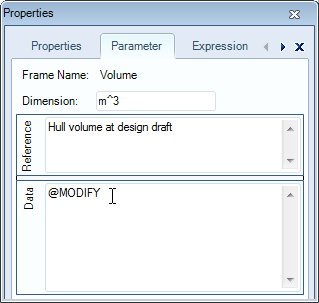
The user must be able to define a table containing a number of transverse reference planes. In the Domain Expert version of the tutorial, it was shown that a user can modify calculated values after they are determined by the system, if this is configured so the the Knowledge Engineer. You can enable this functionality by adding a @MODIFY attribute to the data slot of the parameter.
- Click on the parameter
Volumein the Knowledge Browser, select the Parameter tab of the Properties window and enter@MODIFYin the Data field.
2 Modify parameter display order
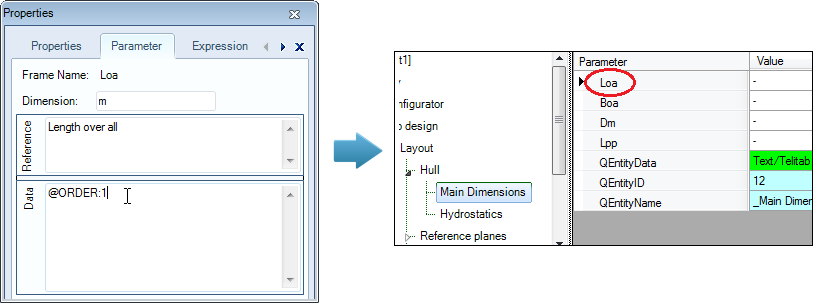
It can be desirable to influence the parameter display order in the Workbase list. Normally, Quaestor puts parameters in alphabetal order. An @ORDER attribute on a parameter defines the relative position of the parameter in the Workbase list. Define this position by: @ORDER:RelativePosition, in which RelativePosition is an integer. The @ORDER values need not be consecutive. Parameters are sorted on RelativePosition from low to high. Values with no @ORDER attribute are placed below parameters with @ORDER attributes.
Here, as an example, you will place parameter Loa at the top of the list. It is up to you to order the other parameters.
- Click on the parameter
Loain the Knowledge Browser, select the Parameter tab of the Properties window and enter@ORDER:1in the Data field.
3 Define minimum and maximum values for parameters
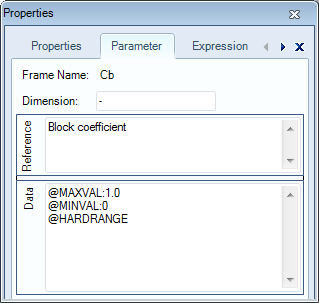
Another interesting feature to assist the user, is to provide feedback about minimum and maximum input values. Moreover, you can make these boundaries into hard ranges in order to prevent the user from providing values that might cause faulty results.
As an example, you can define a minimum and a maximum for the parameter Cb. This value must lie between 0 – 1.0. The system should issue a warning if the computed or input value is not within this range. This is done by means of the attributes @MAXVAL and @MINVAL. If you want the system to force a value inside this range, add @HARDRANGE as well.
- Add the following attributes to parameter
Cb:@MAXVAL:1.0,@MINVAL:0,@HARDRANGE
4 Show computed values during the dialogue
TODO is me nog niet duidelijk (ASR)
To show computed values during a dialogue you have to include the standard Quaestor parameter “QEntityData” (with the drag and drop functionality) from the Knowledge Browser in Entity “Hydrostatics”. You will find the parameter by either typing its name in the search box of the Knowledge Browser (field 1 of Figure 32). Or go to the top node of the tree in the Knowledge Browser (with the name of your knowledge base) and search in the list on the right side.
After dragging and dropping the parameter to the Entity, write “@SHOW” within the value of this parameter. Now, computed values in this Entity will always be shown during a dialogue. Figure 69 presents the result for Entity “Hydrostatics”.

Figure 69: Entity "Hydrostatics" in taxonomy
5 Some more entities for the ship configurator
2.3.5 Entity “Reference planes”
- Create the following entities as children of entity “Reference planes”.
Transverse planes | child of “Reference planes” | Entity type: singular obligatory |
Horizontal planes | child of “Reference planes” | Entity type: singular obligatory |

2.3.6 Entity “Transverse planes”
We want to create the possibility for the user to define a table containing a number of transverse reference planes. In section 4.6 of the first part of the tutorial, the goal for Entity “Transverse planes” is described in detail.
For each plane the user has to define a position and a name.
First create the following parameters in the Knowledge Browser. Please note that “Name$” is a string parameter and not a value.
Parameter name | Dimension | Reference |
Nr | [#] | Number of instances |
Name$ | [$] | Name of object |
CaseID | [-] | Case index |
Frame_Nr | [-] | Frame number |
Frame_spacing | [mm] | Frame spacing |
X | [m] | X position, in longitudinal direction |
The parameters “Nr”, “Name$”, “Frame_Nr” and “Frame_spacing” will be determined by “VR: User only” (indicate “VR” in Slots & Properties of parameter).
Now drag and drop the parameters in “Transverse planes“: “Nr”, “Name$”, “CaseID”, “X”, “Frame_Nr” and “Frame_spacing”.
Figure 70 shows all parameters in Entity “Transverse planes”.

...
the purpose of entity Transverse planes is described in detail.
For each plane the user has to define a position and a name.
- Create the following parameters in the Knowledge Browser. Please note that “Name$” is a string parameter and not a value.
Parameter name | Dimension | Determined by | Reference | In Class |
Nr | [#] | Number of instances | ||
Name$ | [$] | Name of object | ||
CaseID | [-] | Case index | ||
Frame_Nr | [-] | Frame number | ||
Frame_spacing | [mm] | Frame spacing | ||
X | [m] | X position, in longitudinal direction |
The parameters “Nr”, “Name$”, “Frame_Nr” and “Frame_spacing” will be determined by “VR: User only” (indicate “VR” in Slots & Properties of parameter).
Now drag and drop the parameters in “Transverse planes“: “Nr”, “Name$”, “CaseID”, “X”, “Frame_Nr” and “Frame_spacing”.
Figure 70 shows all parameters in Entity “Transverse planes”.
Figure 70: Parameters in Entity Transverse planes
1 Enable users to modify calculated values
In the Domain Expert version of the tutorial, it was shown that a user can modify calculated values after they are determined by the system, if this is configured so the the Knowledge Engineer. You can enable this functionality by adding a @MODIFY attribute to the data slot of the parameter.
- Click on the parameter
Volumein the Knowledge Browser, select the Parameter tab of the Properties window and enter@MODIFYin the Data field.
2 Modify parameter display order
It can be desirable to influence the parameter display order in the Workbase list. Normally, Quaestor puts parameters in alphabetal order. An @ORDER attribute on a parameter defines the relative position of the parameter in the Workbase list. Define this position by: @ORDER:RelativePosition, in which RelativePosition is an integer. The @ORDER values need not be consecutive. Parameters are sorted on RelativePosition from low to high. Values with no @ORDER attribute are placed below parameters with @ORDER attributes.
Here, as an example, you will place parameter Loa at the top of the list. It is up to you to order the other parameters.
- Click on the parameter
Loain the Knowledge Browser, select the Parameter tab of the Properties window and enter@ORDER:1in the Data field.
3 Define minimum and maximum values for parameters
Another interesting feature to assist the user, is to provide feedback about minimum and maximum input values. Moreover, you can make these boundaries into hard ranges in order to prevent the user from providing values that might cause faulty results.
As an example, you can define a minimum and a maximum for the parameter Cb. This value must lie between 0 – 1.0. The system should issue a warning if the computed or input value is not within this range. This is done by means of the attributes @MAXVAL and @MINVAL. If you want the system to force a value inside this range, add @HARDRANGE as well.
- Add the following attributes to parameter
Cb:@MAXVAL:1.0,@MINVAL:0,@HARDRANGE
4 Show computed values during the dialogue
TODO is me nog niet duidelijk (ASR)
To show computed values during a dialogue you have to include the standard Quaestor parameter “QEntityData” (with the drag and drop functionality) from the Knowledge Browser in Entity “Hydrostatics”. You will find the parameter by either typing its name in the search box of the Knowledge Browser (field 1 of Figure 32). Or go to the top node of the tree in the Knowledge Browser (with the name of your knowledge base) and search in the list on the right side.
After dragging and dropping the parameter to the Entity, write “@SHOW” within the value of this parameter. Now, computed values in this Entity will always be shown during a dialogue. Figure 69 presents the result for Entity “Hydrostatics”.
Figure 69: Entity "Hydrostatics" in taxonomy
5 Some more entities for the ship configurator
2.3.6.1 Let a parameter change the number of cases in an Entity
...
Overview
Content Tools