Page History
...
Volume = Cb * Lpp * Boa * T_design
These relations can be created in two ways:
...
- Create an entity relation for
Volumein the same way. DeleteENTITY#()in the editor and enter the expression above.
...
The second method There is another way to create an entity relation. One that is very convenient when you know that a particular relation might be used in several entities. You will use this next for parameter Displacement.
4 Connecting existing relations to entities
By adding the relation to the Knowledge Browser, you can connect is it several times to different various parameters in different Entitiesvarious entities, saving a lot of time. TODO
- Create
Volumeusing the first method.
The second method will be used for parameter Displacement, which is explained below.
4 Connecting existing relations to entities
Start with creating a relation Start with creating one or more relations in the Knowledge Browser.
...
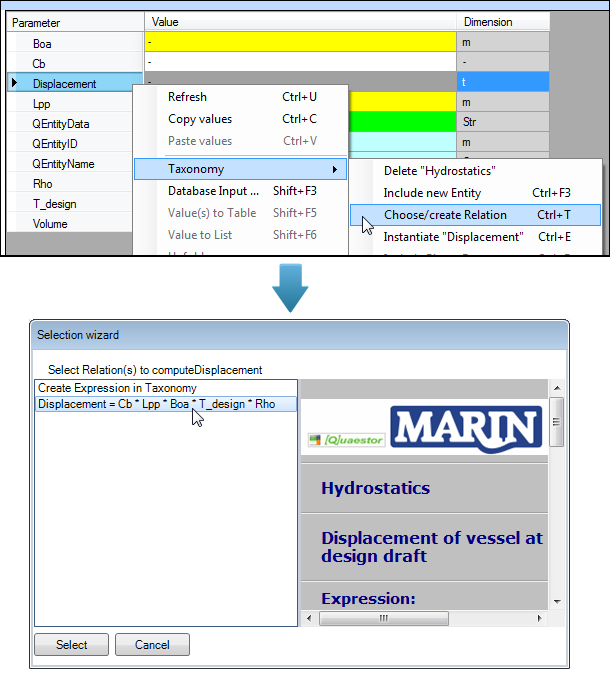 Note that it is still possible to create a new taxonomy relation by selecting the first option in the popup window.
2.3.3.4 Provide the possibility to enable users to modify calculated values
In the first part of the tutorial, with parameter “Volume”, it was shown that it is possible to enable the user to modify calculated values after they are determined by the system. We can enable this functionality by adding a @MODIFY attribute to the data slot of the parameter.
First select parameter “Volume” in the right field of the Knowledge Browser and switch the radio button of the Frame Viewer to the data mode. In here you have to type @MODIFY, see Figure 68.

Figure 68: Provide parameter "Volume" with a @MODIFY attribute
2.3.2.4 Affect presentation sequence of parameters
It can be desirable to affect the sequence of parameters presented in the Workbase list during a dialogue. Normally Quaestor presents parameters in an alphabetical sequence. An @ORDER attribute in the Data Slot of a parameter defines the relative position of a parameter in the Workbase list. Define this position by: @ORDER:RelativePosition, in which RelativePosition is an integer. The higher the value of RelativePosition, the later the value is placed in the list. The @ORDER values of parameters to be presented need not to be subsequent values. Parameters are sorted on RelativePosition. Values with no @ORDER attribute are placed behind parameters with the @ORDER attribute.
We will explain this option only by placing parameter “Loa” at the top of the list. It is up to you to order the other parameters. First select parameter “Loa” in the right field of the Knowledge Browser and switch the radio button of the Frame Viewer to the data mode. In here you have to type “@ORDER:1”, see Figure 55 and Figure 56.
Please note figures in this tutorial can present the sequence of parameters different in comparison with your knowledge base. In that case probably parameters are ordered with @ORDER attributes. It is up to you to do the same.

Figure 55: Order parameters with @ORDER attribute in Data Slot of parameter

Figure 56: Loa on top of the list because of @ORDER: 1 in Data Slot of parameter
2.3.3.5 Define minimum and maximum values for parameters
Another interesting feature to assist the user is providing feedback about minimum and maximum input values. Moreover, you could make these boundaries into hard ranges in order to protect the user against providing value that might cause faulty results.
As an example we want to define a minimum and a maximum for the parameter “Cb”. This value must be between 0 – 1.0 [-].The system should issue a warning if the computed or input value is not within the indicated boundaries. This is done by means of the attributes @MAXVAL and @MINVAL.
When you want to make sure that this range cannot be superseded you also have to add the attribute @HARDRANGE.
Thus, the following attributes have to be added to the parameter “Cb” (how to add attributes to a parameter is described in 2.3.3.4.):
@MAXVAL:1.0
@MINVAL:0
@HARDRANGE
2.3.3.6 Show computed values during the dialogue
To show computed values during a dialogue you have to include the standard Quaestor parameter “QEntityData” (with the drag and drop functionality) from the Knowledge Browser in Entity “Hydrostatics”. You will find the parameter by either typing its name in the search box of the Knowledge Browser (field 1 of Figure 32). Or go to the top node of the tree in the Knowledge Browser (with the name of your knowledge base) and search in the list on the right side.
After dragging and dropping the parameter to the Entity, write “@SHOW” within the value of this parameter. Now, computed values in this Entity will always be shown during a dialogue. Figure 69 presents the result for Entity “Hydrostatics”.

Figure 69: Entity "Hydrostatics" in taxonomy
2.3.4 Strategy for adding relations in taxonomy type of knowledge bases
Before we continue with the next Entity, we want to give more insight in the creation of relations in taxonomy type of knowledge bases. In the previous paragraph you have noticed that we created Entity-relations, paragraph 2.3.3.2 above and “normal” relations, paragraph 2.3.3.3 above. But why do we have two different methods?
You have three ways of adding and using relations:
- Adding an Entity relation to the Entity in a Taxonomy;
- Add a relation to the Knowledge Browser and connect it to a parameter in an Entity;
- Create a relation in the Knowledge Browser and let the modeler determine which relations to use to determine a parameter in an Entity. This is only facilitated when all parameters in the Entity will be determined by the modeler.
Three important remarks can be made about the use of the different relation types:
...
5 Strategy for adding relations in taxonomy type knowledge bases
TODO: dit vind ik een erg onduidelijk stukje (ASR)
Before we continue with the next Entity, we want to give more insight in the creation of relations in taxonomy type of knowledge bases. In the previous paragraph you have noticed that we created Entity-relations, paragraph 2.3.3.2 above and “normal” relations, paragraph 2.3.3.3 above. But why do we have two different methods?
You have three ways of adding and using relations:
- Adding an Entity relation to the Entity in a Taxonomy;
- Add a relation to the Knowledge Browser and connect it to a parameter in an Entity;
- Create a relation in the Knowledge Browser and let the modeler determine which relations to use to determine a parameter in an Entity. This is only facilitated when all parameters in the Entity will be determined by the modeler.
Three important remarks can be made about the use of the different relation types:
- The general approach is to create Entity relations when you are developing a Taxonomy type of knowledge base.
Only used normal relations when you want to use the modeling/reasoning functionality of Quaestor. You might want to use the modeler when you want to execute complex models which make use of reasoning an advantage over a normal traditional fully hardcoded model (which a Taxonomy is to some extent). This is the case when you want the structure (network of relations) of a model to be dependent on the choices made and input provided by the user. - The main reason to use normal relations and connecting them to parameters in an Entity is when you know that the relation will be used on multiple positions in the Taxonomy. In that case you rather create one relation and connect it to the parameters in the relevant Entities.
- Use the ENTITY# function only in combination with Entity relations. You can use this function in normal relations but this is not advisable. The reason for use only in Entity relations is that, in case of an Entity relations, the EntityID in the ENTITY# function will be renumbered when modifications are made to the Taxonomy that cause Entities to be renumbered. This renumbering in the relation will not take place for normal relations.
2.3.3.4 Provide the possibility to enable users to modify calculated values
In the first part of the tutorial, with parameter “Volume”, it was shown that it is possible to enable the user to modify calculated values after they are determined by the system. We can enable this functionality by adding a @MODIFY attribute to the data slot of the parameter.
First select parameter “Volume” in the right field of the Knowledge Browser and switch the radio button of the Frame Viewer to the data mode. In here you have to type @MODIFY, see Figure 68.
Figure 68: Provide parameter "Volume" with a @MODIFY attribute
2.3.2.4 Affect presentation sequence of parameters
It can be desirable to affect the sequence of parameters presented in the Workbase list during a dialogue. Normally Quaestor presents parameters in an alphabetical sequence. An @ORDER attribute in the Data Slot of a parameter defines the relative position of a parameter in the Workbase list. Define this position by: @ORDER:RelativePosition, in which RelativePosition is an integer. The higher the value of RelativePosition, the later the value is placed in the list. The @ORDER values of parameters to be presented need not to be subsequent values. Parameters are sorted on RelativePosition. Values with no @ORDER attribute are placed behind parameters with the @ORDER attribute.
We will explain this option only by placing parameter “Loa” at the top of the list. It is up to you to order the other parameters. First select parameter “Loa” in the right field of the Knowledge Browser and switch the radio button of the Frame Viewer to the data mode. In here you have to type “@ORDER:1”, see Figure 55 and Figure 56.
Please note figures in this tutorial can present the sequence of parameters different in comparison with your knowledge base. In that case probably parameters are ordered with @ORDER attributes. It is up to you to do the same.
Figure 55: Order parameters with @ORDER attribute in Data Slot of parameter
Figure 56: Loa on top of the list because of @ORDER: 1 in Data Slot of parameter
2.3.3.5 Define minimum and maximum values for parameters
Another interesting feature to assist the user is providing feedback about minimum and maximum input values. Moreover, you could make these boundaries into hard ranges in order to protect the user against providing value that might cause faulty results.
As an example we want to define a minimum and a maximum for the parameter “Cb”. This value must be between 0 – 1.0 [-].The system should issue a warning if the computed or input value is not within the indicated boundaries. This is done by means of the attributes @MAXVAL and @MINVAL.
When you want to make sure that this range cannot be superseded you also have to add the attribute @HARDRANGE.
Thus, the following attributes have to be added to the parameter “Cb” (how to add attributes to a parameter is described in 2.3.3.4.):
@MAXVAL:1.0
@MINVAL:0
@HARDRANGE
2.3.3.6 Show computed values during the dialogue
To show computed values during a dialogue you have to include the standard Quaestor parameter “QEntityData” (with the drag and drop functionality) from the Knowledge Browser in Entity “Hydrostatics”. You will find the parameter by either typing its name in the search box of the Knowledge Browser (field 1 of Figure 32). Or go to the top node of the tree in the Knowledge Browser (with the name of your knowledge base) and search in the list on the right side.
After dragging and dropping the parameter to the Entity, write “@SHOW” within the value of this parameter. Now, computed values in this Entity will always be shown during a dialogue. Figure 69 presents the result for Entity “Hydrostatics”.
Figure 69: Entity "Hydrostatics" in taxonomy
2.3.4
...
2.3.5 Entity “Reference planes”
...
Overview
Content Tools