Page History
Tutorial 1 Getting started
| Learning goals
| Prior knowledge |  |
1 Objective
As mentioned earlier these tutorials are focussing on providing the basic skills of knowledge engineering. In this first tutorial, the main dimensions of a ship will be systematically varied. The knowledge used is Archimedes’ Law in combination with design requirements, which are the following:
...
Our objective is to generate a dataset of systematically varied ships that meet the design criteriarequirements.
2 Before you start
Before starting with your knowledge engineering, please make sure you are actually using the knowledge engineering user level and you have Quaestor configured in the most convenient layout.
To check/change your user level go to the general tab of Tools>Options Tools -> Options -> General. You can change your User level. If you are not able to change it to Knowledge Engineer (level 3), you do not have KE rights. Please contact your ICT department or Qnowledge for the proper license.
...
When a knowledgebase node is expanded, like Newqkb here, the classes within the knowledgebase are visible. Classes are used to organise your data and equations, and put them in a practicable structure. In Quaestor, all data is put in parameters. You can designate one (or more) parameter as the goal of the calculation.
| Note |
|---|
Classes are a means for organizing parameters for the user. They are not to be confused with a class in object oriented computer programming. The Quaestor core does not use the classes at all.It only uses the parameters! |
the knowledgebase are visible. Classes are used to organise your parameters, and put them in a practicable structure. The Top Goals/Undefined class is part of the knowledge base by default. Here, the goal parameters of your calculation (Top Goals) can be stored, as well as other parameters that don't belong to other classes (Undefined).
Create a new class, named Main Dimensions, in which the following ship parameters are to be stored.
Lpp: Length between perpendiculars
B: Moulded breadth
T: Draught from keel to Construction Water Line
- Right-click on Top Goals/Undefined and select New Class from the popup menu. Give the class the name
Main Dimensions.
...
The class is now shown in the knowledgebase tree, and you can add the parameters Lpp, B and T.
- Select the class
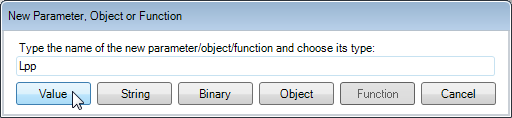
Main Dimensionsand select Knowledge -> New parameter/function from the main menu. Alternatively, click in the right part of the knowledge browser, and select New Parameter / Function (Ctrl+I). Give the parameter the nameLppand click the Value button to select its type. Repeat these actions for the parametersBandT.
The added parameters now appear in the right part of the Knowledge browser like this:
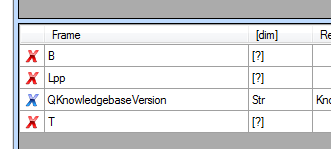
A red cross draws your attention to the fact that a parameter is not yet fully defined for the system to use it.
The first requirement is already satisfied, so let's assign dimensions to the parameters.
- Select the Lpp row in the Knowledge Browser Window. In the Properties window, scroll down to the Dimension row and change the
?intom, the dimension forLpp(meters).
...
- Scroll down to the Reference row and enter "length of ship".
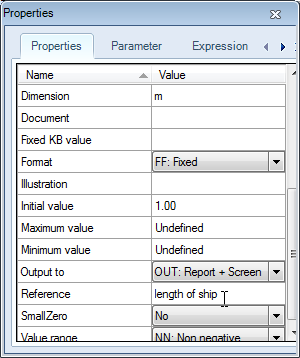
- Assign a dimension and a reference to the other parameters
BandT, just as described above. Of course, the breadth and depth of the ship are defined in meters.
Now only the last requirement for valid parameters has yet to be fulfilled: a way to be determined (input from the user or defined by a relation). This qualification can be provided in the Properties window.
- Select the parameter
Lpp. In the Properties window, scroll down to the Determined by row. Change the value to VR: User only, as the parameter Lpp is input (instead of defined by a relation).
...
to show that Quaestor knows enough about this parameter to use it in a computational model. Now make sure that B and T are determined by VR: User only too. By the way, VR stands for Value RequestedBy the way, VR stands for Value Requested.
| Note |
|---|
If a parameter still shows a red cross when you have provided all needed property values, click on Top Goals/Undefined, and you will see the blue cross. |
Note that above you have explicitly added Lpp, B and T as parameters to the knowledge base. You are also able to implicitly add parameters by creating relations that contain new parameters. Quaestor will automatically add these new parameters to your knowledge base (so, implicitly). You will encounter this in the following section.
...
- Select Top Goals/Undefined in the knowledge browser, right click in the right hand part of the window and select New Relation (Ctrl+N). In the upper part of the new window, delete any proposal (Quaestor may have filled in the last selected parameter), and enter
Rho = 1025
(belonging to salt water), and click Save:
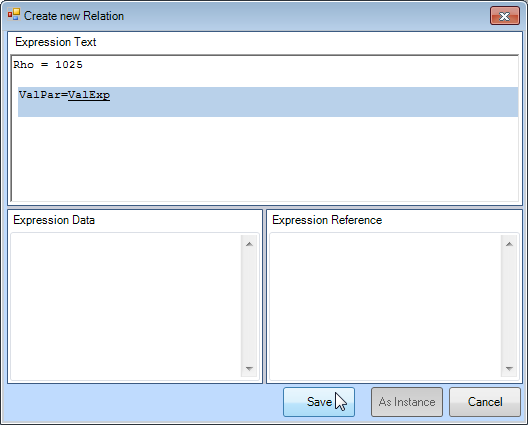
Note that when you enter a relation, Quaestor provides as much help as possible by means of the Help Checker. This checker shows what to expect (in this case a Value or an Expression, ValExp). After saving a relation, the Help Checker will check the syntax for possible errors, and shows a warning message when something is wrong.
Because of entering the relation, the parameter Rho has automatically been created. For Rho to be a valid parameter, a dimension should be assigned.
| Noteinfo |
|---|
The parameter is automatically created in the Class in focus when saving the relation! |
...
- Provide a reference for
Rhoand assign it the dimensionkg/m^3.Rhois now a valid parameter. Furthermore, make sureRhois determined by SYS: System/Equation, as a relation is used to determineRho.
What follows now might seem a bit unconventional: a second relation is given for Rho. This is a nice example of how Quaestor works: in a calculation, Quaestor can find numerous calculation paths and automatically chooses the most appropiate one, based on constraints and available data.
| Noteinfo |
|---|
An infinite number of relations can be assigned to one particular parameter. |
...
- Add the following relation (belonging to fresh water) in a similar way as described above:
Rho = 998
5 Creating constraints
...
- Right click on the relation
Rho = 1025in the Knowledge browser and select Constraint -> Add New. In the upper part of the new window enter the following constraint:
Watertype$ = "SW"
and click Save:
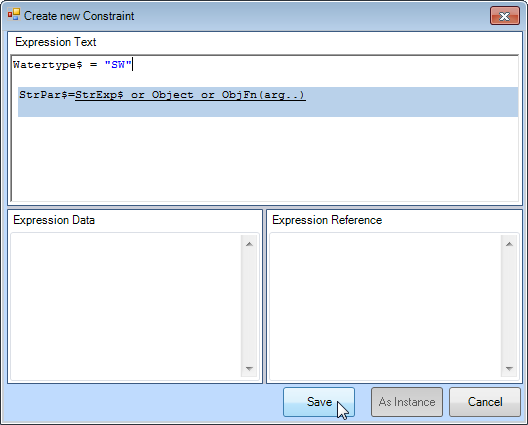
The constraint is now added, and a parameter named Watertype$ has been created. The $ at the end of the parameter name makes sure Quaestor recognizes it as a String value, and the dimension Str is automatically assigned (see also Quaestor syntax). You have to assign a Determined-by value to make it a valid parameter.
...
Repeat the process for the other relation.
- Add the constraint
Watertype$ = "FW"
...
to the relation Rho = 998.
Note that the expression editor assists you with the presentation of existing parameters and intrinsic functions.
...
Whenever Rho is needed in the calculation process, Quaestor will note that the watertype is needed to determine the value of Rho, and will ask the user for this value (because it is assigned to be User only).
When you select a parameter in the upper list, the relations of that particular parameter are visible:
...
6 Creating a dropdown menu
Because there are only two possible values for Watertype$ (SW or FW), it's easy to integrate a dropdown box.
- Select
Watertype$in the Knowledge Browser, select the Parameter tab in the Properties window and in the Reference box enter the following lines:
FW<EQ>Fresh Water
SW<EQ>Salt Water
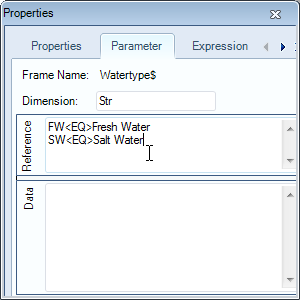
The use of a dropdown box will be clear in a later stage of this tutorial, when calculations are made. Note that you can add the @EQEXPLAIN attribute in the Data box ('data slot') of the Watertype$ parameter (see Frame Viewer for data slot) in order to display only "Salt Water" and "Fresh Water" are shown in the dropbox (so without SW and FW).
7 Creating a relation for the displacement
On the basis of the earlier defined parameters and the block coefficient Cb , the displacement of the ship can be calculated.
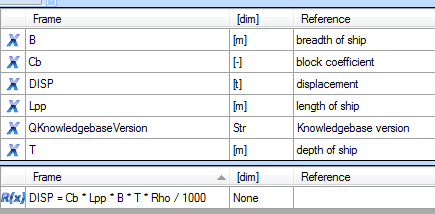
- Add the following relation to the class Main Dimensions:
DISP = Cb * Lpp * B * T * Rho / 1000
which defines the displacement of the ship in tons.
Note that two new parameters are created: the block coefficient Cb and the displacement DISP. In order to keep the knowledgebase meaningful, it is necessary to provide references, dimensions and determined-by values for these parameters.
- Provide references, dimensions and determined by values for
CbandDISP.Cbhas no dimension (-),DISPshould be in tons (t). Just press OK if Quaestor warns that tons is no base dimension (kg), it is just to inform you. We covered this by dividingDISPby 1000. The determined-by values should be VR: VR User Only forCb, and SYS: System/Equation forDISP, as the block coefficient is input and the displacement is determined by a relation. Verify that all parameters now have a blue cross instead of a red one in front of them:
8 Creating a solution
Let's perform your first Quaestor calculation. A solution is always determined by one or more Top Goals. A top goal is a parameter (or object) that is your final calculation target, in this tutorial it's the displacement of the ship.
- Select the class Main Dimensions in the Knowledge browser. Double click the parameter
DISP.
...
- Enter the following data for our first calculation:
B = 10 Cb = 0.55 Lpp = 60 T = 6 Watertype$ = SW (Salt Water)
Note that the input of Watertype$ consists of a dropdownbox, which you created above:
...
After providing the data you have to press the Next button to continue. The actual calculation is started now and because this is a very simple example, the final state is alost almost immediately shown:
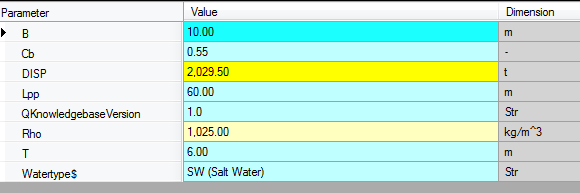
The top goal (DISP) is shown, together with all parameters that were used for the calculation. With these input values, the displacement of the ship is about 2030 tons.
...
As mentioned in the objective, you will create a dataset of systematically varied ships. You could of course perform several calculations with different input data by hand, but it's much easier to use the ability of Quaestor to create multiple case solutions. To keep the complexity of this example within reason, you will only vary the breadth and length of the vessel. Please note that due to some important conceptual reasons, the latest Quaestor release can Quaestor can only perform calculations on ranges of parameters when you already have created a solution.
...
- Change the following input:
B= 9(0.5)11 Lpp= 55(2)69
In this way, B and Lpp are defined by a range, given the start value, step size and end value. For example, Lpp is defined from 55 to 69 meter, with steps of 2 meter.
...
| Info |
|---|
Ranges can be defined in multiple ways:
|
10
...
Filter results
As it is, the multiple case solution table is sorted by the breadth of the ship. Now suppose you'd like parameter Lpp to be the leading parameter in this table.
- In the knowledge browser, select the parameter
Lpp. In the Properties window, scroll down to the row Output to, and select HEADER. Now, refresh the table of the multiple case solution by clicking another solution, and then again the multiple case solution. The table is now headed byLpp.
A lot of cases in your solution don't meet the design criteria: a displacement between 2000 and 3000 ton. We could have fixed this by adding a constraint to DISP, but another way is to use a filter in the solution table.
- In the workbase, select the last (multiple case)
DISPsolution, and click the Filter button. The Filter window shows. ForDISP, select Range as filter, fill in 2000 for Lower bound and 3000 for upper bound. Click the Apply button.
...
Now, only the cases for which 2000 < DISP < 3000 are shown in the table. The objective of this tutorial is now completed: you built a dataset of systematically varied ships that meet the design criteria.
11 Check
You can verify your results by comparing it to [Tutorial 1 Finished] .
Overview
Content Tools