EXCEL# returns the result of an EXCEL spreadsheet calculation in TeLiTab format
Syntax
EXCEL#(Mode%, SourceSheet$, TargetSheet$, TelitabInput$, InputScript$, OutputScript$, [InpVar])
Arguments
- Mode% controls the modus of EXCEL (0 if you don't want to see the sheet, 1 if you want the sheet to be visible).
- SourceSheet$ is the file name of the Excel sheet.
- If no path is included in the string for SourceSheet$, the file is expected to be in the applications directory of the knowledge base (see also Directory structure ).
- If "NullString" is provided as value for SourceSheet$, the sheet has to be embedded in the expression using the right mouse option "Include Binary in frame...".
- TargetSheet$ is the name under which the created Excel sheet will be saved.
- If no path is included in the string for TargetSheet$, the file is saved on the current Report/Project (..\My knowledge\Project\..) directory of this project (see also Directory structure).
- If "NullString" is provided as value, the sheet will not be saved at all.
- TelitabInput$ is the dataset that can be used as input for the calculation (not required as long as all data required for InputScript$ is available).
- InputScript$ is the input script (in TeLiTab format) in which the positions in the spreadsheet are stated.
- OutputScript$ is the output script (in TeLiTab format) in which the positions are given of the data in the sheet to be presented as Telitab$ output of the parameter using the EXCEL#() function.
Parameters in OutputScript$ should also be defined in InputScript$ with an empty spreadsheet position when you want to receive these values as input for Quaestor. This means that Quaestor will deal with these values provided as input in the solution, while these values where originally not provided but only given to in the spreadsheet. (see also examples). - InpVar is an optional list of parameters or expessions. The list may contain one or more parameters required by the InputScript$ of the EXCEL#() function when these are not included in TelitabInput$. In such event, the current case values of the parameters presented in InputScript$ (and included in InpVar or computed earlier) are used as input for the EXCEL file.
Remarks
- EXCEL#() can be used to get data from, sent data to and to process data with an Excel sheet.
- Data can be send to Excel and retrieved from it in several ways. It will very much depend on the type of date, which type of data input and output is most useful. In all cases, the syntax of the expression does not change. However, the setup of the Excel sheets and syntax of the in- and output scripts WILL BE DIFFERENT. In the examples below this will be be explained.
- If OutputScript$ = "NullString", EXCEL#() returns the name of the TargetSheet$ as result. If in this case TargetSheet$ = "NullString", EXCEL#() returns: 0
- Please make sure that numbers taken from a worksheet are presented in decimal "." format (so 34.567 and not as 34,567). For Microsoft Windows, this can be adapted in Control Panel/Regional Settings. If you cannot change this due to other requirements, use the REPLINS$ function:
REPLINS$(Telitab$, ",", ".", 0)
in which Telitab$ is the result of the EXCEL#() function.
5. The scripts (both input and output) for EXCEL#() follows the TeLiTab rules for defining objects/telitabs etc. So, when you want to write something to a sheet named "input" from an object (or TeLiTab) named "DATA" containing parameter "A" and "B" as part of a TeLiTab also containing parameter "C". you can write:
TEXTITEM1=|
2
"C" "input.c(1)"
"DATA"
{
2
"A" "input.A(1)"
"B" "input.B(2)"
}
|
C and DATA are list values in the TeLiTab and therefore TEXTITEM1 starts with 2. DATA is an object or TeLiTab and you want to get A and B from this TeLiTab. This can be written as a list of 2 values.
Please make sure the list number is placed below the bracket "{".
Furthermore, special characters (like "{" or "[") in names of the sheet items you refer to are a risk. It might work sometimes but we did not test all use cases.
6. You should never manually close the Excel sheet that is opened by Quaestor. Return to Quaestor and click on OK in the message box that asks you whether to close Excel. If you do close Excel manually, Quaestor is unable to retrieve data from the sheet.
Examples
In addition to the examples below, Knowledge engineer tutorials covers the use of MS Excel as a satellite. Furthermore, see also Tips & Tricks section of www.quaestor.org.
Example 1a: Writing data to Excel, the preferred method
If you want to export data to Excel to report data, process data or make a graph, the data needs to be sent to an Excel sheet, be processed and be saved under a different name.
Let the text parameter TelitabOutput$ be defined by
TelitabOutput$ = EXCEL#(1, "Calc_sheet.xls", "Result_sheet.xls", TelitabInput#, TEXTITEM$(1),"NullString")
This means that:
- The sheet will be made visible (Mode% = 1).
- The sheet: Calc_sheet.xls will be used to process the data.
- The results will be saved as: Result_sheet.xls.
- The data from: TelitabInput# will be used as input.
- The text in TEXTITEM1 will be used as input script.
- No output will be generated; Outputscript = "NullString". Note that this script should be defined if data from excel needs to be imported to the knowledgebase, see example 1b.
Our TelitabInput# consists of a single-case parameter "No_cases", and a large table of multi-case data:
1
"No_cases" 2000
4 "Lpp" "B" "T" "Cb"
"1" 100 15 6 0.55
"2" 110 16 7 0.60
"3" 120 17 8 0.65
"4" 130 18 7 0.60
"." ... .. . ....
"2000" 140 19 6 0.55
Let the input script in the dataslot of the EXCEL relation be:
TEXTITEM1=|
5
"No_cases" "main_dim.No_cases"
"Lpp" "main_dim.Lpp(1)"
"B" "main_dim.B(2)"
"T" "main_dim.T(3)"
"Cb" "main_dim.Cb(4)"
|
This means:
- 5 list items to be sent to Excel;
- The single-case parameter "No_cases" is put in the cell with the name: No_cases of worksheet: main_dim.
- The parameters "Lpp", "B", "T" and "Cb" have multiple entries. The writing of these values to Excel is as follows:
- Quaestor will go to the column number corresponding with the number behind the parameter name, in the case of Lpp this is the first column;
- Quaestor will start placing values below the point where it finds a cell with the value (not the name) corresponding to the name provided in the input script in front of the column number, in this case "Lpp";
- The same follows for the other multi-case parameters, which are placed in their corresponding columns below the cell with value "B", "T", etc.
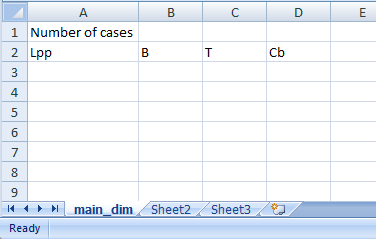
Preparation of the Excel sheet
- Provide the worksheet with the correct sheet name (the tab value), for this example "main_dim";
- For individual values (such as "No_cases" in the example) name the cell you want to store a value in or get a value from:
- In Excel, select the cell you want to place the value in and go to Insert>Name>Define (Excel 2007: tab Formulas>Define Name>Define Name.
- Provide the proper name for the cell as defined in the input script.
- An alternative way is just to type the name in the box holding the cell coordinates (like D6 or AB22) left of the function description box.
- For multi case values (such as Lpp in the example):
- In the correct column (corresponding with the number in the inputscript) provide a cell with a value corresponding with the name prior to the column number in the inputscript.
The EXCEL sheet could look like this:
NOTE:
The described approach requires that the parameters (such as Lpp) have to be available in the indicated columns (1 for Lpp).
Moreover, if a parameter is available more than once in an indicated column, the first case will be taken into account as starting point to write the values.
Furthermore, you could place parameters in the same column. However, when the value represented the name of the parameter is overwritten during the process of writing the values of the other parameter in the column, Quaestor will not be able to find the overwritten value and an error will be the result.
Example 1b: Retrieving processed data from Excel
If data from excel should be imported to the knowledgebase, you should define an output script. (Note that in the above example no output script was defined). The output script is defined similar to the input script, for example:
By using a comparable relation as example 1a, but now with an output script added a TeLiTab with Lpp, V_eco, Rt and PE is received as result:
TelitabOutput$ = EXCEL#(1, "Calc_sheet.xls", "Result_sheet.xls", TelitabInput$, TEXTITEM$(1), TEXTITEM$(2))
with the output script defined by
TEXTITEM2=
|3
"Lpp" "main_dim.Lpp(1)"
"V_eco" "main_dim.V_eco_knots(10)"
"Rt" "main_dim.Rt(17)"
"PE" "main_dim.PE(18)"|
TelitabOutput$ will contain the table with all ships with length (Lpp, which was inserted to the sheet as input and is now read to be present in the TeLiTab), economical speed V_eco, resistance Rt and power PE. These values are read from the corresponding column indicated in the output script (1 for Lpp, 10 for V_eco etc.) and the rows below the cell with the value indicated in the output script (Lpp for Lpp, V_eco_knots for V_eco etc.).
Example 2: Writing complex multi case data sets to Excel, important additional feature!
Sometimes you want to write datasets in blocks of similar cases to an Excel sheet.
For example:
1
"No_cases" 6
3 "TestNo" "Vs" "Ps"
"1" 10001 15 6500
"2" 10001 16 7000
"3" 10001 17 8000
"4" 10002 15 7000
"5" 10002 16 8500
"6" 10002 17 10000
"." ... .. . ....
In this example TestNo indicates the blocks of accompanying data for Vs and Ps.
You can imagine that you want to place these sets of Vs and Ps in separate columns for each TestNo. With the above discussed examples, this is not possible. Therefore, an alternative syntax for the input script is created.
Let the input script in the dataslot of the relation be:
TEXTITEM1=
|
4
"No_cases" "main.No_cases"
"TestNo" "main.TestNo(0+CASENO(TestNo)).1"
"Vs" "main.Vs(0+CASENO(TestNo))"
"Ps" "main.Ps(4+CASENO(TestNo))"
|
This means:
- 4 list items will be sent to Excel (No_cases, TestNo, Vs and Ps);
- The parameter "No_cases" is put in the cell with the name: No_cases of worksheet: main (as in all previous examples).
- The parameter "TestNo" is the so called "Running" parameter. This parameters determines the blocks of accompanying data. When it changes its value, it will be be the indication for Quaestor change the column number (CASENO) for the block of data.
- You see that the syntax
"main.TestNo(0+CASENO(TestNo)).1"
is comparable to example 1.
However, the expression between the brackets is a relation determining the column number. The following rules will be used:
- With CASENO(TestNo) you indicate that Quaestor should calculate the case/column number based on the change of TestNo. In our example this means that Quaestor will start (by default) with 1 as result for CASENO(TestNo). The moment the value for TestNo changes from 10001 into 10002, the result for CASENO(TestNo) will be 2, so 10001 will be writen in the first column and 10002 in the second one.
- Like a normal expression, you can carry out calculation. Thus (4+CASENO(TestNo) will start with column 5 and will change to column 6.
The difference in syntax between
"main.TestNo(0+CASENO(TestNo)).1"
"main.Vs(0+CASENO(TestNo))"
and
is that, by placing ".1" behind "main.TestNo(CASENO(TestNo))", you indicated that only one value should be written, while using the method to jump columns. (for the moment only .1 is supported and only in combination with the CASENO syntax)- Please do write CASENO in upper case.
While keeping the above rules in mind, this method will enable you to use a dynamic change of column numbers. However please note the following:
- Comparable to method 1a, the columns still have to contain the name indicated in the script as value in the spreadsheet.
- Keep in mind this dynamic change of columns while designing your spreadsheet. You should make sure you do not overwrite required information in the sheet as a result of the column hopping... For example (using the above example): writing of Vs and Ps is started in column 1 and 5. When CASENO(TestNo) becomes 5, Vs will conflict with Ps.
- Creating the data set required for the input of this method requires additional expert skills. Usually this table is a product of a structure of several objects in which information is gathered and calculated and which is unfolded (using the UNFOLD#() function) for the parameter to be used as CASENO.
Example 3: Embed the workbook in the expression
In some cases it is more convenient to keep the sheet inside the knowledge base (when distributing the knowledge base as one file for instance).
An Excel sheet can be included in the frame of the expression that uses this sheet. Right click on the relation (not the parameter) in the knowledge browser, and select: Include Binary in frame... and select the Excel sheet you want to include in the frame.
The syntax of the expression using the embedded workbook is almost the same as in the previous examples, except you don't have to address the source sheet anymore. The expression becomes, for instance:
TelitabOutput$ = EXCEL#(1, "", "", TelitabInput$, TEXTITEM$(1),TEXTITEM$(2))
Example 4: Writing data to Excel, alternative (classic) method
Use as the syntax:
TelitabOutput$ = EXCEL#(1, "Calc_sheet.xls", "Result_sheet.xls", TelitabInput$, TEXTITEM$(1), "NullString")
This means that:
- The sheet will be made visible (Mode% = 1).
- The sheet: Calc_sheet.xls will be used to process the data.
- The results will be saved as: Result_sheet.xls.
- The data from: TelitabInput$ will be used as input.
- The text in TEXTITEM1 will be used as input script.
- No output will be generated; Outputscript = "NullString".
An example TelitabInput$ would be (see TELITAB for a description of the TeLiTab format):
1
"No_cases" 4
4 "Lpp" "B" "T" "Cb"
"1" 100 15 6 0.55
"2" 110 16 7 0.60
"3" 120 17 8 0.65
"4" 130 18 7 0.60
An example of the input script in the dataslot of the relation would be:
TEXTITEM1=
|
5
"No_cases" "main_dim.No_cases"
"Lpp" "main_dim.Lpp Ref*"
"B" "main_dim.B Ref*"
"T" "main_dim.T Ref*"
"Cb" "main_dim.Cb Ref*"
|
This means:
- 5 list items in to be sent to Excel;
- The single-case parameter "No_cases" is put in the cell with the name: No_cases of worksheet: main_dim.
- Each entry of the multi case parameter "Lpp" is put in the cell that is the intersection between the column with name "Lpp" and the rows with the name: Ref1, Ref2,...,Refn.
The n the maximum number of rows you have given a name. Ref* in the input script stands for the case number and will correspond with the named row (Ref1 or Ref2).
It is clear that the this method required more preparation of the Excel sheet than as described in example 1a and b.
Therefore, the method in example 1 should be used when the number of cases is extensive (making example 1 or 2 the preferred method). - The String: TelitabOutput$ will contain the name and path of the target sheet that has been used.
Preparation of the Excel sheet
From the above explanation it is clear that you have to prepare your Excel sheet differently from example 1 to be able to receive the data as defined in the input script. You can do this as follows:
- Provide the worksheet with the correct sheet name, for this example "main_dim";
- For individual values (such as "No_cases" in the example):
- In Excel, select the cell you want to place the value in and go to Insert>Name>Define (Excel 2007: tab Formulas>Define Name>Define Name..., or the Name Manager).
- Provide the proper name for the cell as defined in the input script.
- An alternative way is to just type the name in the box holding the cell coordinates (like D6 or AB22)
- For multi values (such as Lpp in the example) an approach is to name a matrix of rows and columns. The row values will be the cases and the column values will be the parameters.
- To define the cases, for each case, select the row and go to Insert>Name>Define (Excel 2007: tab Formulas>Define Name>Define Name);
- Provide the row as defined in the input script with an unique and consecutive order (Ref1, Ref2, etc.), for example :
the first row: Ref1
the second row: Ref2
etc.
- To define the columns for the parameters, for each parameter, select the column (which intersects with the row as defined above) and go to Insert>Name>Define..
- Provide the name for the column as defined in the input script (for example Lpp, B etc).
Like in example 1b, reading data from a sheet prepared in a specific way is exactly the same as writing to it in that way. Thus by using the syntax of the input script as output script, you can also read from Excel sheets prepared as such.
Example knowledgebases
Knowledge engineer tutorials covers the use of MS Excel as a satellite (using example 1a and 1b).
Quick links: Functions overview | Attribute overview | Constants overview | Dimensions overview